For those of us who chose to take the time off during finals last semester, we had the pleasure of joining the charming AAU alum - turned PIXAR intern - turned PIXAR animator
Joey Gilbreath, as he walked us step-by-step through the modification process. The following tutorial is courtesy of Joey which is courtesy of a conglomeration of knowledge he has obtained over the years.
Step 1: Required Materials
- Maya
- Nart rig separated body mesh
(DOWNLOAD HERE)
- A full turnaround, or at least front and side images of the character you're looking to create.
- Norman!
Step 2: Create a Template File
Setting up a template file will be helpful for you when you start modding Norman on a regular basis. No matter what your mod, these first few steps will be the same, so might as well get them out of the way, save out the file as a template file, and save yourself the hassle in the future!
-
Open a new file Maya and
Import your assets:
-
Import the Norman rig
-
Import the Nart body mesh
-
Create a Blend Shape of the Norman body mesh. This is to prevent tampering with or ruining the actual rig, so as not to wreak havoc on your future animation.
-
Separate each asset into layers so you can easily hide/unhide each as you so desire.
i.e the Norman Mesh still attached to the rig on one layer (not including the head, hands or feet), the Norman blend shape on another, the Nart Mesh on another.
-
Save under any name that you will remember.
i.e. NormanMod_Template.ma
Template File with the Nart mesh (seen highlighted) placed over Norman on the left , and the Norman Blendshape on the right.
Step 3: Set up Your Reference
First things first --
Save under a new name. You don't want to ruin your template file, because that will be the start of all your future animations.
i.e. Natman_NormanMod_01.ma
Now it's time to set up some image planes with your reference images of what the character will look like. You can do this one of two ways, I'd suggest
setting up some image planes, but you can also project each one as a
texture if you'd prefer. No matter what you choose, make sure you have two planes, one on your x-axis (for your profile reference) and one on your Z-axis (for the front reference).
File with reference planes set up
Step 4: Sculpt the Nart Mesh
-
Turn your undo's to infinite! This is so important, really, for anytime you are working. Particularly in a step like this where it's easy to go too far, it's nice to get back to a place using an infinite amount of "ctrl+z". This will be under "Undo" in your settings and preferences.
-
Save. In case you haven't noticed, you should really be saving all the time. To make this easier on yourself, turn on incremental saving by clicking the option box and turning it on. This will create an "incremental saves" folder wherever you are saving the scene, and enables you to just hit "ctrl+s" every time you want to save something without re-writing anything. Plus, every once in a while, just for good measure (before going to lunch, taking a break or leaving for the day), I'd actually
Save as... and change the increment at the end of my file name.
i.e. Natman_NormanMod_02.ma
- Hide the Norman Body Mesh so it doesn't get in your way. You can do this by clicking the "V" on the layer you have the Norman Mesh on.
- Optional:
Texture the polys on Nart using lamberts to block out the basic shapes you'll be looking for -- even if it won't be perfect for now, it will help you to keep it in mind.
i.e. For this version of Batman - Black for boots, gloves, undies, mask. Grey for main body - legs, arms, torso. Flesh toned for the lower half of the face.
Basic textures applied
-
Sculpt. It will help if you have a bit of modeling knowledge for this step, but if not, it's time to familiarize yourself with the sculpt deform tool! It's it what will get you about 90% of the way there. Remember to be delicate with it (and again, save often). It's easy to go too far, but this step is all about patience and getting your rig there one click at a time.
-
The Sculpt Geometry Tool has a variety of settings, and you should make sure to test it out first before putting it to use. Here's a brief overview of the capabilities:
Push: Pushes the geometry away from your brush (in)
Pull: Pulls the geometry towards the brush (out)
Smooth: Will round out hard edges into something more manageable.
Relax: Will recede and smooth your geometry.
b + left click: Changes your brush size.
Sculpting the Nart mesh! Make sure to change views often.
Another helpful option is
the Reflection Tool. This will reflect your brush on both sides of your model so you don't have to spend a lot of time trying eye the symmetry. It can be found in the tool settings under Stroke. But careful! If your mesh is not perfectly symmetrical, you could get some funky shapes goin' on when you get to shifting verts around point-by-point.
Reflection tool can be seen in under stroke in the tool options (left hand column. Accessed by double-clicking the tool you're interested in.)
Things to keep in mind:
- You want to make sure you are using a combination of the tools.
i.e.Work the geo, then relax it, work the geo, then relax it.
-
Keep changing views. If you are constantly working from the front view, it's tough to tell what kind of damage you're doing to the work you already put in on the side! Make sure you keep switching back and forth, and even working in the perspective window.
Step 5: Modify your Norman Blend shape
Save.
All modification to the norman rig (Hands, Feet, Face) should be done via the blend shape you created. This will prevent you from destroying any of the actual rig, which could easily break and become unusable for your animation.
Using the Norman Blend Shape, Scale the mesh to fit as closely as you can inside your modified Nart mesh. This will make for a cleaner wrap!
Modifying the Norman Blendshape to fit the sculpted Nart mesh.
Be warned of the following sensitive areas:
-
The mouth (the entire face, really) is a highly-rigged area, thus it's best to do your best to leave it alone. Feel free to mess with the forehead and the cheeks within reason, but do try not to tamper too much. You may notice that Norman's nose is a separate geometry. To modify his nose, I'd suggest creating an entirely NEW nose and sticking it on later.
Putting red around the polygons of the mouth on the blendshape helps to remind yourself to avoid modding that area.
-
The feet also have a ton of controls -- Ball roll, foot twist, toe tap, etc -- that could easily break if you change the foot too much. Thus, again, try not to change the orientation or the size too dramatically or you could be animating with out them.
Step 6: Extras!
Save.
Does your character have gloves, boots, sashes, belts, watches, or any other sort of extraneous detailing in the clothing? No problem!
For gloves/boots: Simply select the faces around the calf and/or forearm and duplicate. Scale the duplicated faces so they hover closely to the surface of the Nart Mesh, and then move vertices around as necessary to create the look that you want. We can wrap these on top to add a little flare, and so your mod isn't just wearing the equivalent of body paint.
Sashes, belts or clothing details: You can also create the details out of other objects like a torus or a cylinder etc, depending on your needs. Just make sure you model them almost like they are a part of the Nart Mesh you modified and then we can wrap those on top, too!
Watches and the like can simply be parented to the wrist using constraints. (Demo coming, Spring 2013)
Step 7: Prep for the Wrap
Save. (I'm sounding redundant, but you'll thank me later)
If your character is wearing clothes or gloves or boots, you should hide all the extraneous geo that will not be seen beneath them. You can do this by creating a new texture that is completely transparent and applying to the faces. Not all wraps are perfect and sometimes the extra geo can intersect what is visible, so might as well get it out of the way.
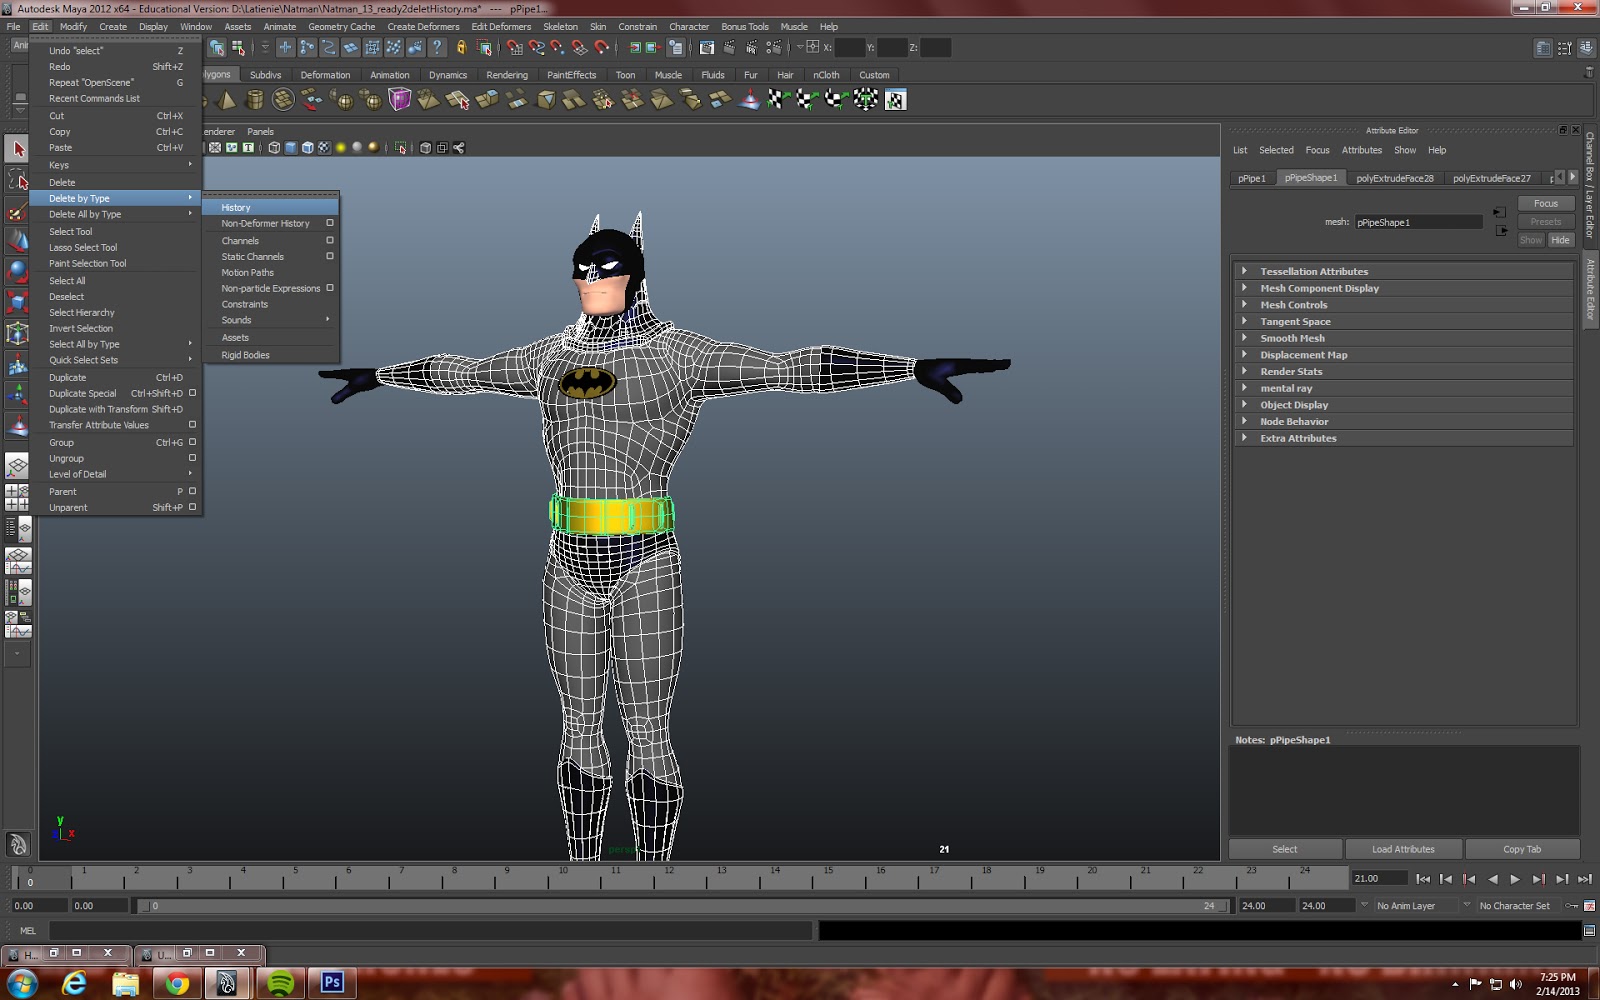
Delete history and Freeze Transformations on all geo to be wrapped. (NOT THE NORMAN MODEL OR BLENDSHAPE)
- Select all geo.
- Modify, Freeze Transformations
- Edit, Delete By Type, History
Freezing Transformations
Deleting History
Step 8: Wrap
Save.
To wrap:
- Select Nart mesh
- Select Norman Rig mesh. You will notice he is in pieces, start anywhere, you only need to select one piece of it.
i.e. forearm
- Make sure you are under the animation tab, then Create Deformers > Wrap
Creating our wrap
Deselect all.
- Select Nart mesh
- Select the next piece of the Norman Rig mesh.
- Edit Deformers > Add influence
- Repeat until you have added every piece of Norman's rig as an influence
Adding an influence
Note:
DO NOT WRAP TO THE BALL JOINTS. Norman's elbows ankles and feet are all spheres. Don't wrap to them. You just don't need to and it won't wrap as cleanly.
You can then wrap all your clothes (Gloves, boots, etc) to the wrap using the same process!
Parent all extras (ears, shoulder pads, watch etc) to the appropriate joint (head, clavicle, wrist, etc)
And there you have it! Feel free to comment or e-mail with any questions. Happy Modding!
A finished mod! Keep in mind that it won't be perfect, and you may have to seek the aid of a corrective blendshape to get things perfect. (see red arrow)