Showing posts with label PIXAR. Show all posts

Monday, February 29, 2016

Words of Wisdom: Guest Speaker Andrea Goh on Applying to Internships

This past October we were delighted to have Andrea Goh, Technical Director and one of last summers TD Interns at Pixar. She shared thoughts from preparation to her experience as an intern.
Since it's applying season, we thought we'd pass along some of her wisdom. 


Keep Learning & Improving
  • Have a positive mindset and attitude
  • Take Control of choosing your classes — Don’t just take what your advisor tells you too
  • Challenge yourself to improve your skills — try something new!
  • Don’t give up on solving problems — Do everything you can before going to someone else for help.
  • ** Scripting in any CG position makes you more valuable


Be Active in the Industry.
  • Attend conventions, Tea Time, workshops and share your work 
  • Educate yourself with the latest industry news
  • Talk to people in the industry
  • Always make sure your Linked and Resume are up to date

Be Genuine, Be Nice.
  • Be true to yourself
  • Collaboration is greater than competition
  • Be a team player
  • BE NICE!
  • Drop your ego, nobody’s better than anyone, we’re just trying to make films!

Apply With Personality. 
  • Plan your pieces in your reel. Do every project with the intention of it being on your reel
  • Work on collaborative projects! - Doing different roles. 
  • Have experience and projects on your resume
  • Interest/Additional info on you're resume.  Pixar is a place with very active people that is different then work, what are your hobbies!
  • Show your personality in your coverlet
  • Have a clean and straightforward website.
  • ** Plan enough time for yourself to prepare and apply with full satisfaction
Final Words.
  • Always present a problem with a possible solution
  • never bash your own work during a presentation
  • nobody wins until all your teammates reach the finish line
  • Share and bring out the best in people
  • Never stop learning cool stuff.


The Pixar Undergraduate Program (PUPs) is a 10 week long internship where, each week you do a different part of the pipeline. Modelling, Shading, Lighting, Rigging, Camera, Set Dressing, FX. With 1 Group Project & 1 Final Project. Not only is the PUPs program a great way to learn the technical side of being a TD, but it is 10 weeks of non stop learning, and a great bonding experience. The PUPs created their final project from start to finish in one week. They had to come up with different concepts and narrow it down until they had a collective idea and were able to present and get approval from their mentors. 
You can find some of the past PUP's reels here:

Wednesday, September 9, 2015

The Return of Fall and the Great Mike Makarewicz


That's right! The indelible Michal Makarewicz will be kicking off our fall semester with a full demo and lecture. Details are in the poster above, and we'll see you there. 

SPACE EXTREMELY LIMITED -- Wear your merchandise to secure a spot!

Happy Animating!

Monday, August 17, 2015

Free Portfolio Review with the Animation Collaborative

If you haven't seen - Our friends at the Animation Collaborative are excited to announce that registration for the Fall workshops is now open! They've got some great courses lined up -- as many of us here can be testament to.

If you haven't heard of them before, The Animation Collaborative offers amazing supplemental education to all of the Bay Area students' current curricula. They have a strong and eager body of students ready to share work and ideas!

Most importantly, however, they have announced a FREE Demo Reel and Portfolio Review and Open House on August 28 at 6:00pm, where they will have animators and artists from Pixar looking at Animation Reels, Design and Visual Development portfolios, and Storyboard portfolios!

Don't miss out on this incredible opportunity, and we hope to see you there!

Happy Animating

Don't forget to join the conversation at www.teatimeanimation.com 
Questions? Don't hesitate to get in touch with us at info@teatimeanimation.com
Twitter: @TeaTimeAnimates
Instagram: @TeaTimeAnimation

Wednesday, December 31, 2014

Evening with Pixar

I'm sure many of you were disappointed that there wasn't a Pixar movie for 2014 but now they have a lot of movies in the works and planned. More work for us! As such, Pixar will be looking for new talent that they can train and hopefully integrate. To share with us the upcoming opportunities of internships and residencies, before everyone was off for the holidays, we got a visit from Kim Diaz, senior recruiter, Ryan Howe, university relations program lead, and Anika Holloway, human resources coordinator.

There are different type of internships, classroom based and production based. Classroom based internships are structured actually like a class where you go in to learn and be mentored. Story, animation, and the Pixar Undergraduate Program (PUP) fall under classroom based and last 10 to 12 weeks during the summer. The other type is production based where you will get to work on actual shows in production. As such, the openings are based on production needs and typically last 12 to 18 weeks.

Residencies are also based on production needs are are for those who want to be technical directors or go into software engineer and research. They can last 6 months to a year.

The summer internships and a few residencies have already been posted on www.pixar.com/careers/Available-Internships so I hope you're prepared!

Speaking of being prepared, what exactly do you do and what is Pixar looking for? Apply online at the above link with your resume, cover letter, and a link to your online reel/portfolio. If your reel/portfolio is password protected, that's fine, just have the link and password included in your resume. Make sure to do all this by the deadline, March 1st 2015!

We've probably went over what goes into resumes, cover letters, and reels numerous times but let's do a review. Limit your resume to one page and list any awards won, related classes, projects, and any events volunteering; show what you have done above and beyond a classroom setting. Make your cover letter stand out from others by having it being personalized and creative. Put your best work first on your demo reel and then followed by other best work (yes, only your BEST work goes on your reel) for a reel that is 1 to 3 minutes long; once you're finished, include a breakdown and always get others to review it.

Tea Time Animation, the only way to spend your tea time!

Don't forget to join the conversation at www.teatimeanimation.com 
Questions? Don't hesitate to get in touch with us at info@teatimeanimation.com
Twitter: @TeaTimeAnimates
Instagram: @TeaTimeAnimation

Sunday, December 14, 2014

So You Want to be a Pixar Intern

Nicole Ridgwell and Spectra Sani

This summer, the amazing and talented Nicole Ridgewell and Spectra Sani were two of the privileged Pixar Animation Interns! As Tea Time alum, they humbly agreed to drop by club to share their experiences, and tips on how to structure your reel to be what Pixar is looking for.

Just what does it take to catch the eye of the Pixar Internship Coordinators? Nicole and Spectra tell us it's not just about sitting alone in front of a computer plowing through your animation day in and day out.  Our heroines urge students to get out of their rooms and over to the labs! It's important to be able to socialize with others, and it helps to maintain your sanity when you are inspired by talented friends. Getting into classes with Industry Teachers helps a lot (If you're an AAU student, the Pixar Classes should be your top priority!) Having someone up-to-date with information about the workplaces you are striving for is great leap towards your goals. If you feel that you're not getting the attention or the teaching that you need, try taking a class over at the Animation Collaborative. It's good to supplement your animation classes with  drawing, acting, and story classes to get those creative juices flowing. It's also possible to find all the inspiration you need at your local coffee shop! Make sure you take time to observe (and live) life and it will always add to your work.

When you think you're ready to apply, take a good look at your reel. Make sure you only have your best shots -- it's fine if your reel is short and simple; 2 shots can be enough to do it. Remember: You are always judged by the worst piece in your reel. Create believable characters and only add sound if it adds to the shot. You don't need to have fancy final rendered shots - your pieces can even be work in progress with nothing but some well thought out blocking! Just make sure that your idea is clear and your animation is clean. Use a simple title card to introduce yourself, and always make sure you tailor your reel for the company you are applying to. Pixar probably doesn't want to see something super violent with zombies ripping of people's heads while blood is spurting everywhere. That being said, don't just animate a shot for the purpose of applying to the studio. Instead, work on something you care about; Make it personal and relatable, emote yourself through the character, and people will respond to it.

Your reel showcases your work, but your resume and cover letter are effectively the face of your application. Your business papers should be concise and to the point (no one has time to read through the novel of your life), but make sure you have a voice! We should be able to feel your personality through your words, while still maintaining your professionalism. Trust me, they know you're a fanboy or girl, it is not appealing to emphasize this. It is vital to have good spelling and grammar. Always. If you have references, despite how redundant this may seem, make sure that they like you. More importantly, make sure that they know they are going to be a reference! Surprises are only good for parties and gifts, my friends. Always communicate effectively with your network.

So, with all this work, what can you expect from the Internship? On top of many group activities, and and an inevitable plethora of silly outfits, each intern will be assigned a personal mentor to work with for the duration of the summer. The Animation Internship, itself, is a lot like the Pixar classes! You will be doing assignments animating things such as a Lifesaver, the Luxo Lamp, posing exercises, walkcycles, pantomime, and 3 dialogues. Through these assignments you'll learn how to have a clean workflow, create appealing poses, owning confident ideas, making clear choices, and have clear blocking.

Even if you weren't chosen, don't be discouraged and remember to keep in touch. Just because you weren't selected this time around, doesn't mean there isn't a place for you in the future. Without being obnoxious, feel free to reach out every few months and at the end of projects, as it will showcase your continual interest, and (hopefully) your own, personal growth as an artist.

Finally, Pixar is great but it shouldn't be your only goal. There are tons of awesome opportunities out there so go and explore the world. Don't let your ego limit your choices. Don't get discouraged. Don't compare yourself to others. Be awesome, be yourself, and own it.

Happy Animating!

Don't forget to join the conversation at www.teatimeanimation.com 
Questions? Don't hesitate to get in touch with us at info@teatimeanimation.com
Twitter: @TeaTimeAnimates
Instagram: @TeaTimeAnimation

Sunday, January 26, 2014

Welcome to Spring 2014!


Good afternoon and happy last day of freedom before the spring madness begins! It's been yet another excessively long break, and though we managed to keep fairly busy, I'm sure everyone is more than eager to hunker down and get to work.

First things first: A HUGE congratulations is in order for Tea Time's one and only Frank-Joseph Frelier on obtaining the Pixar spring semester Production Internship! Not that any of us doubted it for a second, we are unspeakably proud of you and wish you the best of luck in your endeavors.


For any of you joining us for the first time this year - Welcome!
Frank, along with fantastic Tea Time board members Mendel, Andy, and dedicated Tea Timer George had the privilege of chatting with you at the Meet and Greet over at Kezar Pavillion yesterday! We can't wait to see all your smiling faces at our first meeting this Friday, January 31. Location and Time is TBD right now, so keep your eyes peeled - but I'm willing to tell you that we may be visited by some very special friends, so you don't want to miss out!

Happy animating, and we'll see you Friday!

Don't forget to join the conversation at www.teatimeanimation.com
Questions? Don't hesitate to get in touch with us at info@teatimeanimation.com
Twitter: @TeaTimeAnimates
Instagram: @TeaTimeAnimation

Friday, December 13, 2013

PIXAR - Production Management Intern - Spring 2014

Photo courtesy of pixar.com


Due to some of our even more connected connections - and of course the magic of the world wide interweb - a little birdie has told us that PIXAR is hoping to begin reviewing resumes for a Production Management Intern as early as this Monday, December 16th. Opportunity is limited to current students only (sorry, grads), and the start date would be sometime in January.

Please visit our forums for full details on required skills and abilities.

Interested candidates can apply at pixar.com/careers.

Good luck, and Happy Animating.

Monday, December 9, 2013

An Afternoon with Neth Nom


In amongst the hustle and bustle of the last few weeks, Tea Time had the pleasure of welcoming the talented Neth Nom to our Friday meeting. To a full house, Neth delivered an incredibly insightful - albeit moderately intimidating - lecture on the state of the industry, getting the most out of school, landing your first job, and what the future might hold for the next generation of graduates. With the fall semester coming to a close, and another batch of students walking the commencement road, I give you this summary of what he had to say.


Planning your Career as an Animator
with Neth Nom


Look around. 

Look at all the faces around you; your friends, acquaintances, perhaps people you haven't met yet. (for the sake of our online crew - think about where you're delegating your time to. Who else is reading this article?) What's the one thing you all have in common? You've all got a leg up on so many of your peers. And why? Because you're taking the time to invest in a community. This community. The community that could, one day, easily be your future.

Contrary to popular belief, your career doesn't start your senior year - not even your junior year! It starts the moment you walk through the doors (or sign in online) to your first class in your first year of university. Do you know what classes you're taking next semester? Sure, that's easy. But what about the semester after that? How about the semester after that? No? Perhaps it's about time that you start. School is an investment - depending on the school you attend, it a HUGE investment - and so you should be getting the most out of the money you're putting in. A big part of that is planning ahead. Not sure what path to take? Well, that's where this community comes in!

A huge part of this industry comes from the company you keep. It's no secret, I'm sure, that an individual almost needs a referral to get a second glance these days - but where do you get them? By starting to build those relationships now. Attend talks; befriend, talk to and ask questions of the most talented person in your classes; Join a community (i.e. Tea Time) to find those people with like minds and together, immerse yourself in the culture of animation. It's time to develop a genuine interest in the field you are preparing yourself for.

Frame through shots from your favorite animated films; get together and animate as a group - not all on the same shot, per se, but simply keeping each other in check; you should be as familiar with animation as some people are of sports -- You should know names and shots like they were athletes and successful plays! This is your future, don't phone it in.

-----

Let's take a look at what an average student's day looks like. A typical 24 hours.

As you can see, it appears to be a pretty balanced life. There's some time in there for a social life, a little "me" time to watch some TV. For those who enjoy a little cash flow, feel free to swap out those for "job". It's a nice, comfortable pace.  


Unfortunately, with the competitive nature of the animation industry (particularly after a large amount of layoffs across the board), comfortable students are going to get no where. There are people with years of experience out there right now looking for the same jobs as you; you've got a lot of ground to cover. 


Now let's take a look at what your schedule should look like.

For a student hoping to make the most of their time while they are in school, this is an ideal schedule.

I know it looks intimidating, but in reality, it's not that much work. You just have to ask yourself what's more important: The newest episode of Family Guy (RIP, Brian) or achieving your goals? The more you sacrifice now, the greater the reward will be later when you set yourself up for opportunity.

"But what will I even animate for twelve hours? I only get x number of assignments per week, there is only so much I can do before I need feedback from my teacher."

We've heard these arguments time and time again and you are wrong. You can animate all the time because not every piece needs to be a piece for your reel. It is so important to keep this in mind. You should treat your work like a sketchbook, just like any artist would. Practice animating just a sphere, just a limb, but steer clear of the whole body. For those of you with those long months off - use your intersessions wisely! Take this time to bust out exercises, you don't have to wait for a teacher to practice.

-----

Just as important as planning your day, is planning your coursework throughout your degree. It may be hard to know what you want to do up front, but the sooner you lock on to something, put your head down and get to work, the sooner your begin tallying the hours of practice.

Many schools give away free books of course listings, and they can also be found online, but don't blindly sign up for anything. This is where your community comes in. Find people that you trust in years ahead of you and talk to them. What classes did they take? What path would they recommend? Which professor is better for classes x, y, or z? Again, places like Tea Time are perfect for these sorts of questions. Online students - don't hesitate to use the forums to get in touch with your on-site peers! Many of us have met your teachers in person and help guide you towards the most ideal instructors. Take the initiative to sculpt your education in to what you need it to be.

Most importantly, however, is this word of warning: Taking more than one animation class a semester is a recipe for disaster. We've all heard the phrase "quality over quantity", and it couldn't be truer now. Taking more than one animation class (okay, maybe you can press it to two) immediately begins dividing your attention in ways that will not enhance your ability. Not only are you receiving two sets of opinions on the same subject, but you'll have double the amount of animation homework (i.e. weight-bearing work) to complete each week. This leaves no wiggle room for any "sketchbook" exercises, or personal exploration in animation and you'll get burnt out. Fast.

It's important to stock the rest of your schedule with strong foundation classes to enhance and sharpen your eye for animation, not dull it out. Take classes that will make you be a better animator, not just classes where you are animating.

Never forget: This is your career! School is just a tool, a resource for you on your path to success. Take ownership of your own life; be proactive; talk to those who came before you. Show good work ethics in the class, because your peers can vouch for you later. Reach out to your peers, learn from each other, and most importantly, don't be afraid to ask for help!

-----
Graduation!
-----

The likelihood of getting a job straight out of school these days is pretty slim.
Please consider the following chart:


This chart represents the unfortunate fact of industry saturation. On the left, we have a list of on- campus students and an approximate number of how many graduate per year, while on the right we have the approximate number of actual, available internships (from the big 5) there's a pretty remarkable disparity here -- particularly when you add in online schools, like Animation Mentor, who have 300 students graduate a year. This disparity is caused by the layoffs, declining ticket sales/movie going, and, of course, simply the amount of interest in the art form.

So what is a graduate to do? First things first - maintain a community of animators, and don't stop animating. If you maintain connection with your community, you'll be in the first to know of new job opportunities, and also more likely to have someone who could recommend you. Plus, your friends and colleagues will keep you motivated to keep working, providing the feedback you'll need and the encouragement to continue.

Beyond that, it's time to be honest: is it the industry, or your reel? Reconsider your options - perhaps feature work just isn't right for you! But that doesn't mean you have no place. There are apps, startups, games, commercials - so many venues to vent your desire to animate, try to find one that works for you.


-----
First Job!
----- 

With enough focus and dedication, it will come. Hooray, but don't think that your work is over yet. Just as important is getting your first job, is holding onto it for a while.

Don't expect the studio to give you any special treatment - you are new, and you will probably get stuck doing fixes or small 'nothing' shots you can do with your eyes closed after all the practice you put in through school - but it's important not to let yourself feel just that -- "stuck". Put so much love into even the simplest of shots. Knock it out of the park; if the shot is so easy, it's the perfect time to show them what you can do.

Just like in school, you should be planning ahead here, too. Set a 5 year goal! What is it you really want to do? Lead? Direct? Figure it out and then spend every day working towards getting there.

Take advantage of the studio's resources - make sure to look after yourself. The studio's highest priority is the studio, and generally this means they have absolutely no qualms letting go of under-achieving underlings. It's important to build a network here, too. Also like in school, surround yourself with those you can learn from and look up to. Though it's important to hunker down and get work done, don't forget to connect! Figure out how it is you want to be perceived - mingle! Don't let your colleagues fill in the blanks for you. Remember, these are the people who, given the opportunity, can vouch for you when it matters most.

Finally, not all jobs last forever. Keep track of your contract - particularly when it's supposed to end. If you know you're not coming back, never wait until the contract ends to apply for a job. Companies are big machines and it often takes a while to get anything done. It's too easy to get stuck with dwindling funds and months of unemployment.

-----
A Final Word
-----

It's not magic.

There is no 'big secret' to success except hard work, initiative, drive and more hard work. It sounds grueling, but don't be intimidated! This is good. News. It means with a little bit of effort, that your goals, your dreams of working in animation are always within your reach.

--------------------------------------

Thanks again, Mendel, Neth.
Happy Animating.


Don't forget to join the conversation at www.teatimeanimation.com
Questions? Don't hesitate to get in touch with us at info@teatimeanimation.com
Twitter: @TeaTimeAnimates
Instagram: @TeaTimeAnimation

Sunday, December 8, 2013

'Reel Talk' Webinar with Reel Feedback

Good morning and happy Monday! I certainly hope everyone had as lovely a weekend as we did.

No?

Well that probably means you missed the 'Reel Talk' Webinar hosted by the charming Hans Brekke of Reel Feedback and moderated by Tea Time's own Lana Bachynski. If you happened to have missed out on the live showing, don't worry, we've got you covered. Please enjoy 'Reel Talk' in full, below, and keep your eyes peeled for another session coming up in the new year!

That being said - you don't have to wait. Did you know you can get amazing feedback on your work straight from professionals at your favourite companies any day of the year? Go to www.reelfeedback.com for more information.

Don't forget to join the conversation at www.teatimeanimation.com
Questions? Don't hesitate to get in touch with us at info@teatimeanimation.com
Twitter: @TeaTimeAnimates
Instagram: @TeaTimeAnimation


Sunday, November 24, 2013

Being Insecure

As a warm up for the post-Neth Nom lecture post, I thought I would share this tasty tidbit of TEDx enthusiasm from Riot Games' Animator Tomáš Jech. (Thanks, Alicia Schaffer.)

Sunday, September 29, 2013

Mike Makarewicz Reader's Digest Style: Part III - Acting and Performance

Last week, Tea Time had the pleasure of welcoming Pixar Directing Animator / Animation Collaborative founder Michal Makarewicz to our stage for a third time -- as per usual, it was a humbling and inspiring experience. Though it wouldn't do to give away every little secret Michal graciously shared with us (you'll have to join us next time), I've done my best to translate any relevant information from my frantically scrawled notes here for the online community to enjoy (bear with me, it was a very visual lecture). Looking for more? Please feel free to join us at www.teatimeanimation.com.

Although our audience only had but a day's notice to change and/or cancel plans and/or skip class to attend our event due to unforeseen complications with AAU (Did you go to your Townhall Meeting this week?), ~150 of us piled into the theatre for the chance to hear some Pixar-grade insight into one of animation's most intimidating topics: Acting and Performance. He began with some comprehensive advice from Sir Ian McKellen:


Helpful, no? Well on the one hand - of course not. We have obviously learned nothing here. However, on the other hand, is there really any better way to sum up what it takes to be an actor? Any better way to dictate what it means to create a beautiful performance? Can you teach someone how to pretend? If so, how do we even begin to approach the subject?

"Well, as an animator, we can usually start with the principles," Michal continues, "in which case I generally see three important things to consider: 

One is POSING. I can then go through all of the principles and find which ones I apply to posing i.e: Pose to pose vs. straight ahead, squash and stretch, solid drawing (posing), exaggeration, appeal, staging, etc...

The next is MOTION. I can do the same thing here; find which principles directly apply to the actual movement of the character - They may overlap i.e. Followthrough and overlap, straight ahead vs. Layered, slow in/slow out, squash and stretch, secondary action, etc...

But over all, none of this will really matter. Obviously it will to a point, but it's the third category that will make or break a piece: CHOICES." If we make good choices, this is what will draw in the audience, make them believe in and connect with our characters. If we make poor choices, however, this is the exact same thing that will pull the audience away from us. When the characters make decisions that invoke thoughts like, "Oh, please, no one would ever do that" or "What? but..why?" in our viewers, we lose them."

"So, how is it we know what choices to make?" Michal asks. The answer is easy - we simply have to know our characters. Here's what Mike deems important to him when he begins a shot:


He considers his dialogue, he considers his characters, and then he considers this list. Why? Because it helps to eliminate choices! If you're able to whittle out the things your character would never do, it becomes easier to see the things they would. "We can't just move stuff,"he tells us, "our whole job [as an animator] is to bring soul to our work."...that being said, we also can't over do it.

As an animator, we should be invisible; we don't want the audience to think about the animation at all - not even in a good way! (i.e "what beautiful animation.") If the viewer sees the animator through the work, that animator is too involved. Remember: those acting choices are coming from within the character. It's not the animator moving a puppet around, it's internal motivation.

Do LESS as an animator - if you have a dialogue shot and you can get away with 3 main ideas - good! 2? Great! Stop trying to hold the audience's hand, you're overacting.

"The two most common mistakes I see in young animators are A) not thinking it through, and B) showing off. You need to move something, but you don't need to move EVERYTHING. There doesn't have to be a new pose for every word - And chill out on the eyebrows. "

First things first, we can take a macro look at the piece before we begin - what do we have: A character, and a shot. WHO is the character? What is the PURPOSE of the shot? HOW will the character fulfill it's purpose?

Let's start off with the shot - what is the context?
          --> Where is your character in relation to the main story? (what is their history?)

What is the dialogue?
          --> Mood? (what is the energy level?)
          --> Is the character saying what he's thinking?
          --> What IS he thinking?

What is the length?
          --> What is there time for? (enough time for thought process?)

Now, the Character -- who are they?
         --> List the main adjectives that define this person
         --> "You know my mother, she's just going to..."
         --> What are the ingredients? You should be able to identify this person! List actors, family, friends, anyone that resembles the character psychologically that can help you understand.


When you draw from films with great actors, or documentaries or - heaven forbid - even your real life experiences, your audience will feel closer to the characters, and can, therefore, help you fill in some of those blanks. Remember: you don't have to SHOW everything, emotions are closer in real life. If you depict them more accurately as opposed to so exaggerated, the audience will connect and insert pieces of themselves - things they recognize and identify with - into your characters, creating an even stronger connection.


If you know your character inside and out, it's easier for you to make appropriate, relatable decisions for them. Put your thinking cap on! What drives them: Their head? Heart? Stomach? Get inside their head. Take Remi and his brother Emile from Ratatouille. Remi is lead by his heart, meanwhile Emile is constantly thinking about filling his belly. 
Or, perhaps, Star Trek's Spock, Captain Kirk and Dr. McCoy:

Spock is lead by his head; very analytical, Captain Kirk is always lead by his heart, and McCoy, well, not exactly lead by his belly, but he is a nice balance of all of the above.

It's important to think about their history: What have they experienced? What do they want and what are they willing to do to get it? Remember: Every character wants something, even if it's just a glass of water.

Moving into animation, it's important to remember that we should be "communicating without complicating"(Ollie Johnston). Moving the character does NOT equal entertainment. Feeling equals entertainment; you have to find the truth within your shot. What is the subtext of your dialogue?

It's important to have an answer to all of these questions that you may develop something relatable. Let's look at what makes a hero vs. what makes a villain. Both are characters who are fighting for something that they believe in (This working with the notion that rarely is it that we come across a villain who is evil simply for the sake of being evil), both are characters who clearly think that what they are doing is 'right' - so how is it we identify one as the hero? It's by how much we can relate to the actions that character. One character is designed to make the audience say "I wish I were more like him", while the other character is designed that to make the audience say "I would never do that!" or "who could do something like that?!"  


Often enough, history has a profound affect on the decisions our characters will choose to make. The pain from the past makes the choices of today. Consider the following clip from the film Groundhog Day. On the off chance you've never seen the movie, A) you should change that, and B) it's about a man (Bill Murray) who, for some reason, manages to get stuck living the same day over and over again. The clip shows a particularly uncomfortable meeting he is forced to endure day after day with an old 'buddy' from high school. As he lives this day over and over and over again, we can see how his history starts to affect the choices he makes in dealing with this situation each day. 


Unfortunately, Mike was obligated to speed through the last leg of his lecture, so my notes aren't quite comprehensive enough (or legible enough) to post here, but there is one, final subject that we touched upon that I found exceedingly important: Body Language.

"If your voice is saying something, but your body is contradicting it, the truth is always in the body".

Body language is such an important part of communicating ideas, and yet we so rarely get to really see that in an animation. If your character is too busy poignantly over-acting out each word with hand gestures and other motions that do nothing but re-say what we can already hear like gibberish ASL, that character will never have the opportunity to really speak to the audience in a resounding and worthwhile manor. Consider the following;


Despite the fact that we have absolutely no facial expressions or dialogue or really any of the usual tells of human emotion, we still know exactly what is going through little Darth's brain every step of the way. The trials, the frustration of the sandwich, the urgency to get to the car but, most potently of all, the absolute THRILL he has when he thinks that he makes the car rev at him. His body language is unmistakable, and as a result, supremely endearing.

_________________________________________________________________________


Like what you read? There's far more where all this came from over at the Animation Collaborative. Check out their wide variety of classes including 2D animation and Demo / Lecture classes over at http://www.animationcollaborative.com/

Curious about any of the concepts or looking to ask a few questions? Please join our community over at www.teatimeanimation.com to get the answers you seek.

Happy animating!

Tuesday, September 10, 2013

Mike Makarewicz - Friday, Sept 13th


IMPORTANT UPDATE:

Due to lack of a suitable meeting space, our event has been temporarily postponed. Our sincerest apologies, but keep your eyes out for updates! THE SHOW WILL GO ON.

Questions? E-mail info@teatimeanimation.com for details.

--------------------------------------------------------------------------------------------------------

That's right, folks! Our first guest lecturer of the fall semester is none other than the Animation Collaborator, himself - Mike Makarewicz! Keep a watchful eye here for the location, and we'll see you Friday!


Monday, April 22, 2013

Tea Time and the Walt Disney Family Museum!

At long last, here is the official invite! Busses will be departing 620 Sutter Street @ 5:30pm sharp. 
Scan the QR code or follow this case-sensitive link to RSVP:

http://goo.gl/dNU0A


Unfortunately the seats for the 3D department are already COMPLETELY SOLD OUT.

The seats for the Visual Development/Illustration departments are now SOLD OUT.
The seats for the 2D department are now SOLD OUT.

We are starting a waiting list, please e-mail teatimeanimationclub@gmail.com to be added. As for Stop Motion, sign up fast!

Sunday, April 21, 2013

PIXAR classes - Fall '13

Just in case you hadn't noticed the plethora of advertising already present around campus...


Saturday, January 12, 2013

A Tea Time 'How To': Modifying the Norman Rig - Part II - Modifying!

For those of us who chose to take the time off during finals last semester, we had the pleasure of joining    the charming AAU alum - turned PIXAR intern - turned PIXAR animator Joey Gilbreath, as he walked us step-by-step through the modification process. The following tutorial is courtesy of Joey which is courtesy of a conglomeration of knowledge he has obtained over the years.


Step 1: Required Materials

- Maya
- Nart rig separated body mesh (DOWNLOAD HERE)
- A full turnaround, or at least front and side images of the character you're looking to create.
- Norman!


Step 2: Create a Template File

Setting up a template file will be helpful for you when you start modding Norman on a regular basis. No matter what your mod, these first few steps will be the same, so might as well get them out of the way, save out the file as a template file, and save yourself the hassle in the future!

- Open a new file Maya and Import your assets:
            - Import the Norman rig
            - Import the Nart body mesh

- Create a Blend Shape of the Norman body mesh. This is to prevent tampering with or ruining the actual rig, so as not to wreak havoc on your future animation.

- Separate each asset into layers so you can easily hide/unhide each as you so desire.
             i.e the Norman Mesh still attached to the rig on one layer (not including the head, hands or feet), the Norman blend shape on another, the Nart Mesh on another.

- Save under any name that you will remember.
             i.e. NormanMod_Template.ma

Template File with the Nart mesh (seen highlighted) placed over Norman on the left , and the Norman Blendshape on the right.


Step 3: Set up Your Reference

First things first -- Save under a new name. You don't want to ruin your template file, because that will be the start of all your future animations.
             i.e. Natman_NormanMod_01.ma

Now it's time to set up some image planes with your reference images of what the character will look like. You can do this one of two ways, I'd suggest setting up some image planes, but you can also project each one as a texture if you'd prefer. No matter what you choose, make sure you have two planes, one on your x-axis (for your profile reference) and one on your Z-axis (for the front reference).


File with reference planes set up

Step 4: Sculpt the Nart Mesh

- Turn your undo's to infinite! This is so important, really, for anytime you are working. Particularly in a step like this where it's easy to go too far, it's nice to get back to a place using an infinite amount of "ctrl+z". This will be under "Undo" in your settings and preferences.

Save. In case you haven't noticed, you should really be saving all the time. To make this easier on yourself, turn on incremental saving by clicking the option box and turning it on. This will create an "incremental saves" folder wherever you are saving the scene, and enables you to just hit "ctrl+s" every time you want to save something without re-writing anything. Plus, every once in a while, just for good measure (before going to lunch, taking a break or leaving for the day), I'd actually Save as... and change the increment at the end of my file name.
              i.e. Natman_NormanMod_02.ma

- Hide the Norman Body Mesh so it doesn't get in your way. You can do this by clicking the "V" on the layer you have the Norman Mesh on.

- Optional: Texture the polys on Nart using lamberts to block out the basic shapes you'll be looking for -- even if it won't be perfect for now, it will help you to keep it in mind.
              i.e. For this version of Batman - Black for boots, gloves, undies, mask. Grey for main body - legs, arms, torso. Flesh toned for the lower half of the face.


Basic textures applied


Sculpt. It will help if you have a bit of modeling knowledge for this step, but if not, it's time to familiarize yourself with the sculpt deform tool! It's it what will get you about 90% of the way there. Remember to be delicate with it (and again, save often). It's easy to go too far, but this step is all about patience and getting your rig there one click at a time.

- The Sculpt Geometry Tool has a variety of settings, and you should make sure to test it out first before putting it to use. Here's a brief overview of the capabilities:

Push: Pushes the geometry away from your brush (in)
Pull: Pulls the geometry towards the brush (out)
Smooth: Will round out hard edges into something more manageable.
Relax:  Will recede and smooth your geometry.
b + left click: Changes your brush size.


 Sculpting the Nart mesh! Make sure to change views often.


Another helpful option is the Reflection Tool. This will reflect your brush on both sides of your model so you don't have to spend a lot of time trying eye the symmetry. It can be found in the tool settings under Stroke. But careful! If your mesh is not perfectly symmetrical, you could get some funky shapes goin' on when you get to shifting verts around point-by-point.


Reflection tool can be seen in under stroke in the tool options (left hand column. Accessed by double-clicking the tool you're interested in.)

Things to keep in mind: 
- You want to make sure you are using a combination of the tools.
                i.e.Work the geo, then relax it, work the geo, then relax it.

- Keep changing views. If you are constantly working from the front view, it's tough to tell what kind of damage you're doing to the work you already put in on the side! Make sure you keep switching back and forth, and even working in the perspective window.


Step 5: Modify your Norman Blend shape

Save.

All modification to the norman rig (Hands, Feet, Face) should be done via the blend shape you created. This will prevent you from destroying any of the actual rig, which could easily break and become unusable for your animation.

Using the Norman Blend Shape, Scale the mesh to fit as closely as you can inside your modified Nart mesh. This will make for a cleaner wrap!


Modifying the Norman Blendshape to fit the sculpted Nart mesh.


Be warned of the following sensitive areas:

-The mouth (the entire face, really) is a highly-rigged area, thus it's best to do your best to leave it alone. Feel free to mess with the forehead and the cheeks within reason, but do try not to tamper too much. You may notice that Norman's nose is a separate geometry. To modify his nose, I'd suggest creating an entirely NEW nose and sticking it on later.


Putting red around the polygons of the mouth on the blendshape helps to remind yourself to avoid modding that area.

- The feet also have a ton of controls -- Ball roll, foot twist, toe tap, etc -- that could easily break if you change the foot too much. Thus, again, try not to change the orientation or the size too dramatically or you could be animating with out them.


Step 6: Extras!

Save.


Does your character have gloves, boots, sashes, belts, watches, or any other sort of extraneous detailing in the clothing? No problem!

For gloves/boots: Simply select the faces around the calf and/or forearm and duplicate. Scale the duplicated faces so they hover closely to the surface of the Nart Mesh, and then move vertices around as necessary to create the look that you want. We can wrap these on top to add a little flare, and so your mod isn't just wearing the equivalent of body paint.


Sashes, belts or clothing details: You can also create the details out of other objects like a torus or a cylinder etc, depending on your needs. Just make sure you model them almost like they are a part of the Nart Mesh you modified and then we can wrap those on top, too!


Watches and the like can simply be parented to the wrist using constraints. (Demo coming, Spring 2013)


Step 7: Prep for the Wrap

Save. (I'm sounding redundant, but you'll thank me later)

If your character is wearing clothes or gloves or boots, you should hide all the extraneous geo that will not be seen beneath them. You can do this by creating a new texture that is completely transparent and applying to the faces. Not all wraps are perfect and sometimes the extra geo can intersect what is visible, so might as well get it out of the way.

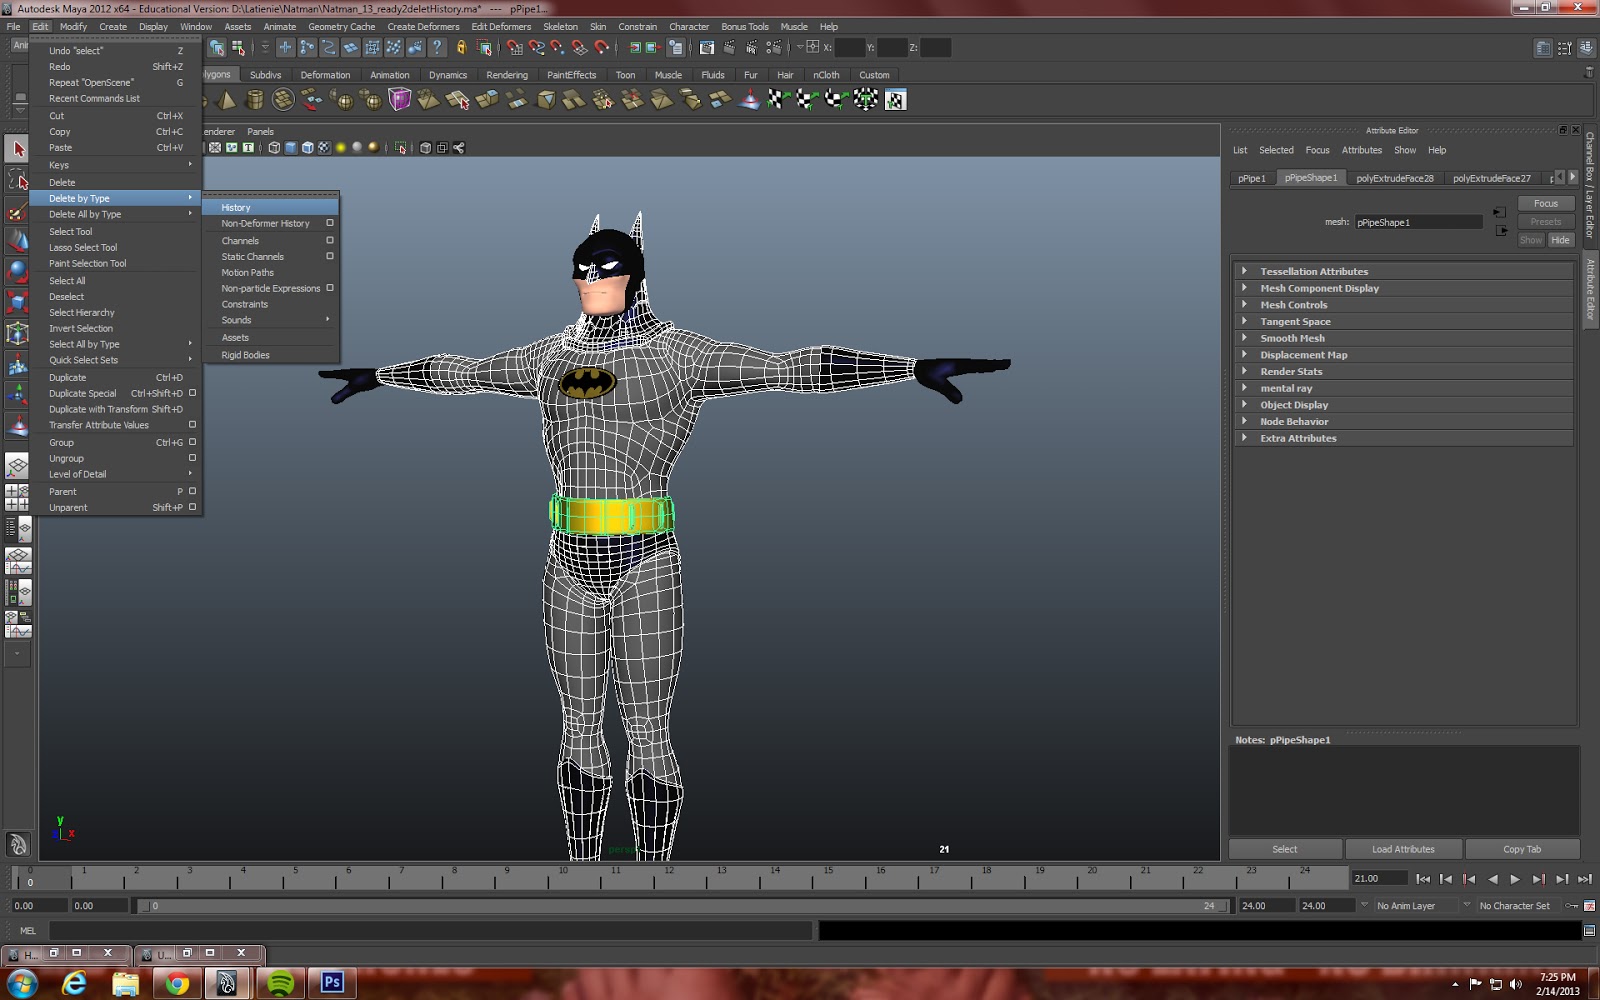
Delete history and Freeze Transformations on all geo to be wrapped. (NOT THE NORMAN MODEL OR BLENDSHAPE)

- Select all geo.
- Modify, Freeze Transformations
- Edit, Delete By Type, History


Freezing Transformations


Deleting History

Step 8: Wrap

Save.

To wrap:

- Select Nart mesh
- Select Norman Rig mesh. You will notice he is in pieces, start anywhere, you only need to select one piece of it. i.e. forearm
- Make sure you are under the animation tab, then Create Deformers > Wrap


Creating our wrap

Deselect all.

- Select Nart mesh
- Select the next piece of the Norman Rig mesh.
- Edit Deformers > Add influence
- Repeat until you have added every piece of Norman's rig as an influence


Adding an influence


Note: DO NOT WRAP TO THE BALL JOINTS. Norman's elbows ankles and feet are all spheres. Don't wrap to them. You just don't need to and it won't wrap as cleanly.

You can then wrap all your clothes (Gloves, boots, etc) to the wrap using the same process!
Parent all extras (ears, shoulder pads, watch etc) to the appropriate joint (head, clavicle, wrist, etc)

And there you have it! Feel free to comment or e-mail with any questions. Happy Modding!


A finished mod! Keep in mind that it won't be perfect, and you may have to seek the aid of a corrective blendshape to get things perfect. (see red arrow)


Friday, January 11, 2013

A Tea Time 'How To': Modifying the Norman Rig - Part I - Why Modify?

Now that everyone has already had ample time to lay back and take it easy, it's about that time to start warming yourself up for the upcoming semester. The tail end of the winter holiday is an ideal opportunity to take your Spring classes into consideration:

- How many animation classes do you have?
- What does the syllabus look like?
- How many assignments are there? But most importantly...
- What are you passionate about?

Working on an assignment is one thing, but fulfilling an assignment with work that you are truly interested in or passionate about will not only get you the grade you're supposed to hunger for, but will also give you a better result in the end.

How does Norman come into all of this? 

Well, for one thing, 99.9% of people are bored of looking at him. For another, even if you don't know it yet, so are you! Even if you colorize that bulbous body of his, it's almost impossible to get so worked up over his bland appearance, and animation generally suffers because of that. How can you expect someone else to be excited about your animation if you aren't?

As Bill Nye would say, Please consider the following:


Loses it's appeal, doesn't it? Thus, we mod!

Benefits of Modifying:

1. The obvious - Appeal! Modifying Norman to suit the needs of your animation creates appeal for your characters and will intrigue your audience -- Particularly if it's something they've never seen before.

2. Rig familiarity - One of the things all animators strive for is speed and efficiency. Doing the best job possible, the fastest possible. While Norman isn't the best rig on the market, he is reliable and easy to work with, thus modifying Norman rather than finding on making a new rig every time you take on a new project is time saving! Not just because you don't have to rig a whole new character (re: bullet 4), but because you will get used to working with Norman. When starting an animation you will know exactly what the rig is capable of, so you'll be able to streamline your ideas from the start. Plus, when getting down to it, you won't be searching for what control does what.

3. Buys you time - Not just in the speed of your animation, but in actually getting to the animation. It's tough sometime to come up with golden ideas on the fly, so thinking about a character first can be helpful. If you're not sure of a story, but know that you want to do a scene with, say a superhero, you can start taking the time to build the character, and then the ideas might come to you in the mean time. 

4. Faster than building a rig from scratch - Though creating your own rig is probably the BEST practice (and if you're capable of doing that within a certain time limit, good on you), it's not often we, as students, have the luxury of that kind of time. Modding Norman will give you your unique character without the painstaking hell that is painting weights -- and it's amazingly effective! (i.e. Fig. 1.0)

No matter how amazing your animation is, Norman -- or any of the basic rigs -- simply will not pack the punch you're looking for without some help.  So, with that in mind, let's get started. 


Fig. 1.0 - Yes. Believe it or not, behind that stern, bold bat logo on his chest, that's still Norman under there.