Showing posts with label student. Show all posts

Monday, December 9, 2013

An Afternoon with Neth Nom


In amongst the hustle and bustle of the last few weeks, Tea Time had the pleasure of welcoming the talented Neth Nom to our Friday meeting. To a full house, Neth delivered an incredibly insightful - albeit moderately intimidating - lecture on the state of the industry, getting the most out of school, landing your first job, and what the future might hold for the next generation of graduates. With the fall semester coming to a close, and another batch of students walking the commencement road, I give you this summary of what he had to say.


Planning your Career as an Animator
with Neth Nom


Look around. 

Look at all the faces around you; your friends, acquaintances, perhaps people you haven't met yet. (for the sake of our online crew - think about where you're delegating your time to. Who else is reading this article?) What's the one thing you all have in common? You've all got a leg up on so many of your peers. And why? Because you're taking the time to invest in a community. This community. The community that could, one day, easily be your future.

Contrary to popular belief, your career doesn't start your senior year - not even your junior year! It starts the moment you walk through the doors (or sign in online) to your first class in your first year of university. Do you know what classes you're taking next semester? Sure, that's easy. But what about the semester after that? How about the semester after that? No? Perhaps it's about time that you start. School is an investment - depending on the school you attend, it a HUGE investment - and so you should be getting the most out of the money you're putting in. A big part of that is planning ahead. Not sure what path to take? Well, that's where this community comes in!

A huge part of this industry comes from the company you keep. It's no secret, I'm sure, that an individual almost needs a referral to get a second glance these days - but where do you get them? By starting to build those relationships now. Attend talks; befriend, talk to and ask questions of the most talented person in your classes; Join a community (i.e. Tea Time) to find those people with like minds and together, immerse yourself in the culture of animation. It's time to develop a genuine interest in the field you are preparing yourself for.

Frame through shots from your favorite animated films; get together and animate as a group - not all on the same shot, per se, but simply keeping each other in check; you should be as familiar with animation as some people are of sports -- You should know names and shots like they were athletes and successful plays! This is your future, don't phone it in.

-----

Let's take a look at what an average student's day looks like. A typical 24 hours.

As you can see, it appears to be a pretty balanced life. There's some time in there for a social life, a little "me" time to watch some TV. For those who enjoy a little cash flow, feel free to swap out those for "job". It's a nice, comfortable pace.  


Unfortunately, with the competitive nature of the animation industry (particularly after a large amount of layoffs across the board), comfortable students are going to get no where. There are people with years of experience out there right now looking for the same jobs as you; you've got a lot of ground to cover. 


Now let's take a look at what your schedule should look like.

For a student hoping to make the most of their time while they are in school, this is an ideal schedule.

I know it looks intimidating, but in reality, it's not that much work. You just have to ask yourself what's more important: The newest episode of Family Guy (RIP, Brian) or achieving your goals? The more you sacrifice now, the greater the reward will be later when you set yourself up for opportunity.

"But what will I even animate for twelve hours? I only get x number of assignments per week, there is only so much I can do before I need feedback from my teacher."

We've heard these arguments time and time again and you are wrong. You can animate all the time because not every piece needs to be a piece for your reel. It is so important to keep this in mind. You should treat your work like a sketchbook, just like any artist would. Practice animating just a sphere, just a limb, but steer clear of the whole body. For those of you with those long months off - use your intersessions wisely! Take this time to bust out exercises, you don't have to wait for a teacher to practice.

-----

Just as important as planning your day, is planning your coursework throughout your degree. It may be hard to know what you want to do up front, but the sooner you lock on to something, put your head down and get to work, the sooner your begin tallying the hours of practice.

Many schools give away free books of course listings, and they can also be found online, but don't blindly sign up for anything. This is where your community comes in. Find people that you trust in years ahead of you and talk to them. What classes did they take? What path would they recommend? Which professor is better for classes x, y, or z? Again, places like Tea Time are perfect for these sorts of questions. Online students - don't hesitate to use the forums to get in touch with your on-site peers! Many of us have met your teachers in person and help guide you towards the most ideal instructors. Take the initiative to sculpt your education in to what you need it to be.

Most importantly, however, is this word of warning: Taking more than one animation class a semester is a recipe for disaster. We've all heard the phrase "quality over quantity", and it couldn't be truer now. Taking more than one animation class (okay, maybe you can press it to two) immediately begins dividing your attention in ways that will not enhance your ability. Not only are you receiving two sets of opinions on the same subject, but you'll have double the amount of animation homework (i.e. weight-bearing work) to complete each week. This leaves no wiggle room for any "sketchbook" exercises, or personal exploration in animation and you'll get burnt out. Fast.

It's important to stock the rest of your schedule with strong foundation classes to enhance and sharpen your eye for animation, not dull it out. Take classes that will make you be a better animator, not just classes where you are animating.

Never forget: This is your career! School is just a tool, a resource for you on your path to success. Take ownership of your own life; be proactive; talk to those who came before you. Show good work ethics in the class, because your peers can vouch for you later. Reach out to your peers, learn from each other, and most importantly, don't be afraid to ask for help!

-----
Graduation!
-----

The likelihood of getting a job straight out of school these days is pretty slim.
Please consider the following chart:


This chart represents the unfortunate fact of industry saturation. On the left, we have a list of on- campus students and an approximate number of how many graduate per year, while on the right we have the approximate number of actual, available internships (from the big 5) there's a pretty remarkable disparity here -- particularly when you add in online schools, like Animation Mentor, who have 300 students graduate a year. This disparity is caused by the layoffs, declining ticket sales/movie going, and, of course, simply the amount of interest in the art form.

So what is a graduate to do? First things first - maintain a community of animators, and don't stop animating. If you maintain connection with your community, you'll be in the first to know of new job opportunities, and also more likely to have someone who could recommend you. Plus, your friends and colleagues will keep you motivated to keep working, providing the feedback you'll need and the encouragement to continue.

Beyond that, it's time to be honest: is it the industry, or your reel? Reconsider your options - perhaps feature work just isn't right for you! But that doesn't mean you have no place. There are apps, startups, games, commercials - so many venues to vent your desire to animate, try to find one that works for you.


-----
First Job!
----- 

With enough focus and dedication, it will come. Hooray, but don't think that your work is over yet. Just as important is getting your first job, is holding onto it for a while.

Don't expect the studio to give you any special treatment - you are new, and you will probably get stuck doing fixes or small 'nothing' shots you can do with your eyes closed after all the practice you put in through school - but it's important not to let yourself feel just that -- "stuck". Put so much love into even the simplest of shots. Knock it out of the park; if the shot is so easy, it's the perfect time to show them what you can do.

Just like in school, you should be planning ahead here, too. Set a 5 year goal! What is it you really want to do? Lead? Direct? Figure it out and then spend every day working towards getting there.

Take advantage of the studio's resources - make sure to look after yourself. The studio's highest priority is the studio, and generally this means they have absolutely no qualms letting go of under-achieving underlings. It's important to build a network here, too. Also like in school, surround yourself with those you can learn from and look up to. Though it's important to hunker down and get work done, don't forget to connect! Figure out how it is you want to be perceived - mingle! Don't let your colleagues fill in the blanks for you. Remember, these are the people who, given the opportunity, can vouch for you when it matters most.

Finally, not all jobs last forever. Keep track of your contract - particularly when it's supposed to end. If you know you're not coming back, never wait until the contract ends to apply for a job. Companies are big machines and it often takes a while to get anything done. It's too easy to get stuck with dwindling funds and months of unemployment.

-----
A Final Word
-----

It's not magic.

There is no 'big secret' to success except hard work, initiative, drive and more hard work. It sounds grueling, but don't be intimidated! This is good. News. It means with a little bit of effort, that your goals, your dreams of working in animation are always within your reach.

--------------------------------------

Thanks again, Mendel, Neth.
Happy Animating.


Don't forget to join the conversation at www.teatimeanimation.com
Questions? Don't hesitate to get in touch with us at info@teatimeanimation.com
Twitter: @TeaTimeAnimates
Instagram: @TeaTimeAnimation

Sunday, March 3, 2013

A Brief Psychology of Head Turns

This Friday, Tea Time had the pleasure of sitting down and letting our very own Rene Salazar step up and deliver a brief, informative lecture on the psychology of head turns. Here's what he had to say:

If we consider the way a head rotates as with the rotation tool in Maya, there are three major axis to pivot upon: x, y, and z. While working, these may just seem like a means to an end -- i.e. I wanted his head turned to the left, so I rotated on the y -- but if we take a moment to consider the meaning conveyed behind each rotation, we can really start using this tool to our advantage to strengthen the posing of our characters.

"Meaning," you say? Why Body Language, of course!

While we, as a species have the luxury of language, only about 40% of communication is what we say mand how we say it. 60% of what we are trying to convey to each other is communicated through body language. While words are important,  communication is also, largely, the transfer of emotion, and one of the easiest way to convey emotion, is through our bodies! Body language in general is a much larger topic, though, so today we'll just focus on head turning.

First things first, Rotate X (like saying "yes" -- up and down).

At either end of this rotation spectrum lies emotions representing Great Glory or Great Tragedy or something vs. nothing.

i.e. Rotating the spine to face upwards through the x-axis opens up the body creating a feeling of hope or triumph -- or "something!" Rotating the spine to curl in on itself, facing the body down through x-axis, closes the character off, creating a feeling of loss or seclusion -- or "nothing."

Next, we have Rotate Y (like saying "no" -- left to right).

This rotation plane conveys awareness. Is asks questions like "Who's there?", "What's there?"

i.e. Picture someone in the military entering the room gun first -- the first thing they do is search along that plane for "who" and/or "what. OR it could be something as simple as rotating the eyes back and forth, it's much more sly, but still conveying the same idea.

Finally, Rotate Z (like a pendulum -- tilting back and forth)

This rotation plane is representative of "Aww" and "huh?"

i.e. If you find yourself looking at cute baby puppy you might find yourself tilting your head to the side and saying "Awwwww!" Meanwhile, if that puppy happens to look back at you, it might tilt its head to the side and think "huh?"

In addition to all the rotation planes, translating the head can help to emphasize the emotions you're trying to convey.

Translating Forward represents attraction or intrigue, while Translating Backwards represents repulsion or disgust.

Rene Salazar
Tea Time Animation
Spring '13


Have your own idea for a lecture? Don't hesitate to e-mail us at teatimeanimationclub@gmail.com to book a talk.


Saturday, January 12, 2013

A Tea Time 'How To': Modifying the Norman Rig - Part II - Modifying!

For those of us who chose to take the time off during finals last semester, we had the pleasure of joining    the charming AAU alum - turned PIXAR intern - turned PIXAR animator Joey Gilbreath, as he walked us step-by-step through the modification process. The following tutorial is courtesy of Joey which is courtesy of a conglomeration of knowledge he has obtained over the years.


Step 1: Required Materials

- Maya
- Nart rig separated body mesh (DOWNLOAD HERE)
- A full turnaround, or at least front and side images of the character you're looking to create.
- Norman!


Step 2: Create a Template File

Setting up a template file will be helpful for you when you start modding Norman on a regular basis. No matter what your mod, these first few steps will be the same, so might as well get them out of the way, save out the file as a template file, and save yourself the hassle in the future!

- Open a new file Maya and Import your assets:
            - Import the Norman rig
            - Import the Nart body mesh

- Create a Blend Shape of the Norman body mesh. This is to prevent tampering with or ruining the actual rig, so as not to wreak havoc on your future animation.

- Separate each asset into layers so you can easily hide/unhide each as you so desire.
             i.e the Norman Mesh still attached to the rig on one layer (not including the head, hands or feet), the Norman blend shape on another, the Nart Mesh on another.

- Save under any name that you will remember.
             i.e. NormanMod_Template.ma

Template File with the Nart mesh (seen highlighted) placed over Norman on the left , and the Norman Blendshape on the right.


Step 3: Set up Your Reference

First things first -- Save under a new name. You don't want to ruin your template file, because that will be the start of all your future animations.
             i.e. Natman_NormanMod_01.ma

Now it's time to set up some image planes with your reference images of what the character will look like. You can do this one of two ways, I'd suggest setting up some image planes, but you can also project each one as a texture if you'd prefer. No matter what you choose, make sure you have two planes, one on your x-axis (for your profile reference) and one on your Z-axis (for the front reference).


File with reference planes set up

Step 4: Sculpt the Nart Mesh

- Turn your undo's to infinite! This is so important, really, for anytime you are working. Particularly in a step like this where it's easy to go too far, it's nice to get back to a place using an infinite amount of "ctrl+z". This will be under "Undo" in your settings and preferences.

Save. In case you haven't noticed, you should really be saving all the time. To make this easier on yourself, turn on incremental saving by clicking the option box and turning it on. This will create an "incremental saves" folder wherever you are saving the scene, and enables you to just hit "ctrl+s" every time you want to save something without re-writing anything. Plus, every once in a while, just for good measure (before going to lunch, taking a break or leaving for the day), I'd actually Save as... and change the increment at the end of my file name.
              i.e. Natman_NormanMod_02.ma

- Hide the Norman Body Mesh so it doesn't get in your way. You can do this by clicking the "V" on the layer you have the Norman Mesh on.

- Optional: Texture the polys on Nart using lamberts to block out the basic shapes you'll be looking for -- even if it won't be perfect for now, it will help you to keep it in mind.
              i.e. For this version of Batman - Black for boots, gloves, undies, mask. Grey for main body - legs, arms, torso. Flesh toned for the lower half of the face.


Basic textures applied


Sculpt. It will help if you have a bit of modeling knowledge for this step, but if not, it's time to familiarize yourself with the sculpt deform tool! It's it what will get you about 90% of the way there. Remember to be delicate with it (and again, save often). It's easy to go too far, but this step is all about patience and getting your rig there one click at a time.

- The Sculpt Geometry Tool has a variety of settings, and you should make sure to test it out first before putting it to use. Here's a brief overview of the capabilities:

Push: Pushes the geometry away from your brush (in)
Pull: Pulls the geometry towards the brush (out)
Smooth: Will round out hard edges into something more manageable.
Relax:  Will recede and smooth your geometry.
b + left click: Changes your brush size.


 Sculpting the Nart mesh! Make sure to change views often.


Another helpful option is the Reflection Tool. This will reflect your brush on both sides of your model so you don't have to spend a lot of time trying eye the symmetry. It can be found in the tool settings under Stroke. But careful! If your mesh is not perfectly symmetrical, you could get some funky shapes goin' on when you get to shifting verts around point-by-point.


Reflection tool can be seen in under stroke in the tool options (left hand column. Accessed by double-clicking the tool you're interested in.)

Things to keep in mind: 
- You want to make sure you are using a combination of the tools.
                i.e.Work the geo, then relax it, work the geo, then relax it.

- Keep changing views. If you are constantly working from the front view, it's tough to tell what kind of damage you're doing to the work you already put in on the side! Make sure you keep switching back and forth, and even working in the perspective window.


Step 5: Modify your Norman Blend shape

Save.

All modification to the norman rig (Hands, Feet, Face) should be done via the blend shape you created. This will prevent you from destroying any of the actual rig, which could easily break and become unusable for your animation.

Using the Norman Blend Shape, Scale the mesh to fit as closely as you can inside your modified Nart mesh. This will make for a cleaner wrap!


Modifying the Norman Blendshape to fit the sculpted Nart mesh.


Be warned of the following sensitive areas:

-The mouth (the entire face, really) is a highly-rigged area, thus it's best to do your best to leave it alone. Feel free to mess with the forehead and the cheeks within reason, but do try not to tamper too much. You may notice that Norman's nose is a separate geometry. To modify his nose, I'd suggest creating an entirely NEW nose and sticking it on later.


Putting red around the polygons of the mouth on the blendshape helps to remind yourself to avoid modding that area.

- The feet also have a ton of controls -- Ball roll, foot twist, toe tap, etc -- that could easily break if you change the foot too much. Thus, again, try not to change the orientation or the size too dramatically or you could be animating with out them.


Step 6: Extras!

Save.


Does your character have gloves, boots, sashes, belts, watches, or any other sort of extraneous detailing in the clothing? No problem!

For gloves/boots: Simply select the faces around the calf and/or forearm and duplicate. Scale the duplicated faces so they hover closely to the surface of the Nart Mesh, and then move vertices around as necessary to create the look that you want. We can wrap these on top to add a little flare, and so your mod isn't just wearing the equivalent of body paint.


Sashes, belts or clothing details: You can also create the details out of other objects like a torus or a cylinder etc, depending on your needs. Just make sure you model them almost like they are a part of the Nart Mesh you modified and then we can wrap those on top, too!


Watches and the like can simply be parented to the wrist using constraints. (Demo coming, Spring 2013)


Step 7: Prep for the Wrap

Save. (I'm sounding redundant, but you'll thank me later)

If your character is wearing clothes or gloves or boots, you should hide all the extraneous geo that will not be seen beneath them. You can do this by creating a new texture that is completely transparent and applying to the faces. Not all wraps are perfect and sometimes the extra geo can intersect what is visible, so might as well get it out of the way.

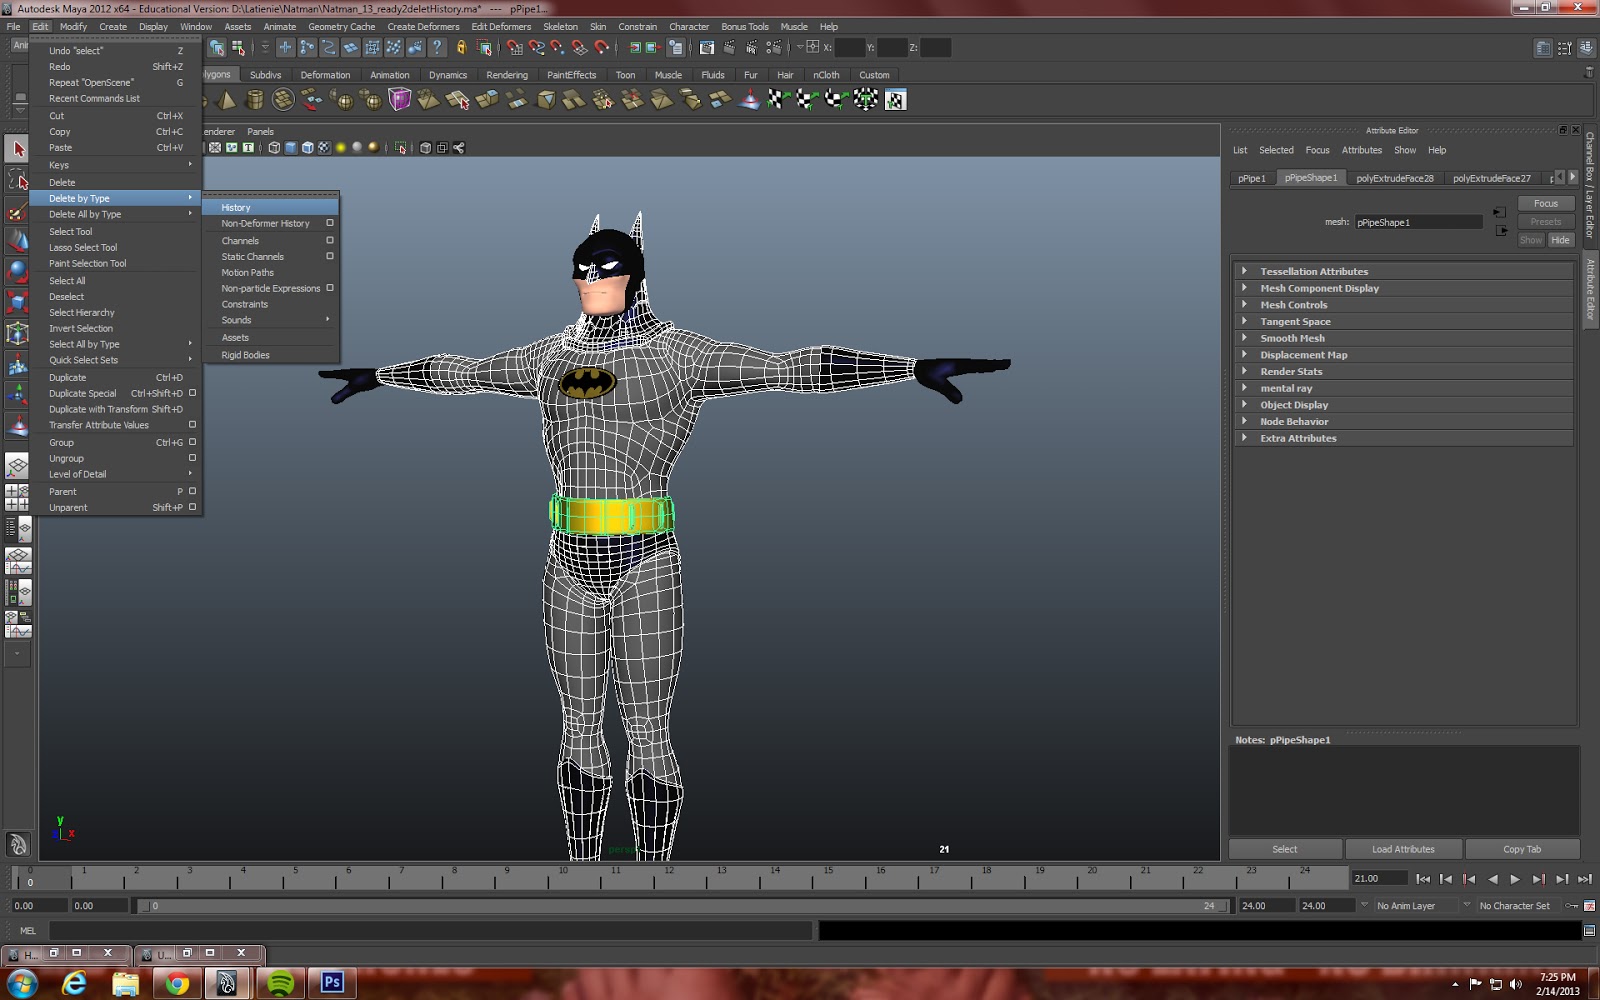
Delete history and Freeze Transformations on all geo to be wrapped. (NOT THE NORMAN MODEL OR BLENDSHAPE)

- Select all geo.
- Modify, Freeze Transformations
- Edit, Delete By Type, History


Freezing Transformations


Deleting History

Step 8: Wrap

Save.

To wrap:

- Select Nart mesh
- Select Norman Rig mesh. You will notice he is in pieces, start anywhere, you only need to select one piece of it. i.e. forearm
- Make sure you are under the animation tab, then Create Deformers > Wrap


Creating our wrap

Deselect all.

- Select Nart mesh
- Select the next piece of the Norman Rig mesh.
- Edit Deformers > Add influence
- Repeat until you have added every piece of Norman's rig as an influence


Adding an influence


Note: DO NOT WRAP TO THE BALL JOINTS. Norman's elbows ankles and feet are all spheres. Don't wrap to them. You just don't need to and it won't wrap as cleanly.

You can then wrap all your clothes (Gloves, boots, etc) to the wrap using the same process!
Parent all extras (ears, shoulder pads, watch etc) to the appropriate joint (head, clavicle, wrist, etc)

And there you have it! Feel free to comment or e-mail with any questions. Happy Modding!


A finished mod! Keep in mind that it won't be perfect, and you may have to seek the aid of a corrective blendshape to get things perfect. (see red arrow)


Friday, January 11, 2013

A Tea Time 'How To': Modifying the Norman Rig - Part I - Why Modify?

Now that everyone has already had ample time to lay back and take it easy, it's about that time to start warming yourself up for the upcoming semester. The tail end of the winter holiday is an ideal opportunity to take your Spring classes into consideration:

- How many animation classes do you have?
- What does the syllabus look like?
- How many assignments are there? But most importantly...
- What are you passionate about?

Working on an assignment is one thing, but fulfilling an assignment with work that you are truly interested in or passionate about will not only get you the grade you're supposed to hunger for, but will also give you a better result in the end.

How does Norman come into all of this? 

Well, for one thing, 99.9% of people are bored of looking at him. For another, even if you don't know it yet, so are you! Even if you colorize that bulbous body of his, it's almost impossible to get so worked up over his bland appearance, and animation generally suffers because of that. How can you expect someone else to be excited about your animation if you aren't?

As Bill Nye would say, Please consider the following:


Loses it's appeal, doesn't it? Thus, we mod!

Benefits of Modifying:

1. The obvious - Appeal! Modifying Norman to suit the needs of your animation creates appeal for your characters and will intrigue your audience -- Particularly if it's something they've never seen before.

2. Rig familiarity - One of the things all animators strive for is speed and efficiency. Doing the best job possible, the fastest possible. While Norman isn't the best rig on the market, he is reliable and easy to work with, thus modifying Norman rather than finding on making a new rig every time you take on a new project is time saving! Not just because you don't have to rig a whole new character (re: bullet 4), but because you will get used to working with Norman. When starting an animation you will know exactly what the rig is capable of, so you'll be able to streamline your ideas from the start. Plus, when getting down to it, you won't be searching for what control does what.

3. Buys you time - Not just in the speed of your animation, but in actually getting to the animation. It's tough sometime to come up with golden ideas on the fly, so thinking about a character first can be helpful. If you're not sure of a story, but know that you want to do a scene with, say a superhero, you can start taking the time to build the character, and then the ideas might come to you in the mean time. 

4. Faster than building a rig from scratch - Though creating your own rig is probably the BEST practice (and if you're capable of doing that within a certain time limit, good on you), it's not often we, as students, have the luxury of that kind of time. Modding Norman will give you your unique character without the painstaking hell that is painting weights -- and it's amazingly effective! (i.e. Fig. 1.0)

No matter how amazing your animation is, Norman -- or any of the basic rigs -- simply will not pack the punch you're looking for without some help.  So, with that in mind, let's get started. 


Fig. 1.0 - Yes. Believe it or not, behind that stern, bold bat logo on his chest, that's still Norman under there.