Saturday, January 12, 2013

A Tea Time 'How To': Modifying the Norman Rig - Part II - Modifying!

For those of us who chose to take the time off during finals last semester, we had the pleasure of joining    the charming AAU alum - turned PIXAR intern - turned PIXAR animator Joey Gilbreath, as he walked us step-by-step through the modification process. The following tutorial is courtesy of Joey which is courtesy of a conglomeration of knowledge he has obtained over the years.


Step 1: Required Materials

- Maya
- Nart rig separated body mesh (DOWNLOAD HERE)
- A full turnaround, or at least front and side images of the character you're looking to create.
- Norman!


Step 2: Create a Template File

Setting up a template file will be helpful for you when you start modding Norman on a regular basis. No matter what your mod, these first few steps will be the same, so might as well get them out of the way, save out the file as a template file, and save yourself the hassle in the future!

- Open a new file Maya and Import your assets:
            - Import the Norman rig
            - Import the Nart body mesh

- Create a Blend Shape of the Norman body mesh. This is to prevent tampering with or ruining the actual rig, so as not to wreak havoc on your future animation.

- Separate each asset into layers so you can easily hide/unhide each as you so desire.
             i.e the Norman Mesh still attached to the rig on one layer (not including the head, hands or feet), the Norman blend shape on another, the Nart Mesh on another.

- Save under any name that you will remember.
             i.e. NormanMod_Template.ma

Template File with the Nart mesh (seen highlighted) placed over Norman on the left , and the Norman Blendshape on the right.


Step 3: Set up Your Reference

First things first -- Save under a new name. You don't want to ruin your template file, because that will be the start of all your future animations.
             i.e. Natman_NormanMod_01.ma

Now it's time to set up some image planes with your reference images of what the character will look like. You can do this one of two ways, I'd suggest setting up some image planes, but you can also project each one as a texture if you'd prefer. No matter what you choose, make sure you have two planes, one on your x-axis (for your profile reference) and one on your Z-axis (for the front reference).


File with reference planes set up

Step 4: Sculpt the Nart Mesh

- Turn your undo's to infinite! This is so important, really, for anytime you are working. Particularly in a step like this where it's easy to go too far, it's nice to get back to a place using an infinite amount of "ctrl+z". This will be under "Undo" in your settings and preferences.

Save. In case you haven't noticed, you should really be saving all the time. To make this easier on yourself, turn on incremental saving by clicking the option box and turning it on. This will create an "incremental saves" folder wherever you are saving the scene, and enables you to just hit "ctrl+s" every time you want to save something without re-writing anything. Plus, every once in a while, just for good measure (before going to lunch, taking a break or leaving for the day), I'd actually Save as... and change the increment at the end of my file name.
              i.e. Natman_NormanMod_02.ma

- Hide the Norman Body Mesh so it doesn't get in your way. You can do this by clicking the "V" on the layer you have the Norman Mesh on.

- Optional: Texture the polys on Nart using lamberts to block out the basic shapes you'll be looking for -- even if it won't be perfect for now, it will help you to keep it in mind.
              i.e. For this version of Batman - Black for boots, gloves, undies, mask. Grey for main body - legs, arms, torso. Flesh toned for the lower half of the face.


Basic textures applied


Sculpt. It will help if you have a bit of modeling knowledge for this step, but if not, it's time to familiarize yourself with the sculpt deform tool! It's it what will get you about 90% of the way there. Remember to be delicate with it (and again, save often). It's easy to go too far, but this step is all about patience and getting your rig there one click at a time.

- The Sculpt Geometry Tool has a variety of settings, and you should make sure to test it out first before putting it to use. Here's a brief overview of the capabilities:

Push: Pushes the geometry away from your brush (in)
Pull: Pulls the geometry towards the brush (out)
Smooth: Will round out hard edges into something more manageable.
Relax:  Will recede and smooth your geometry.
b + left click: Changes your brush size.


 Sculpting the Nart mesh! Make sure to change views often.


Another helpful option is the Reflection Tool. This will reflect your brush on both sides of your model so you don't have to spend a lot of time trying eye the symmetry. It can be found in the tool settings under Stroke. But careful! If your mesh is not perfectly symmetrical, you could get some funky shapes goin' on when you get to shifting verts around point-by-point.


Reflection tool can be seen in under stroke in the tool options (left hand column. Accessed by double-clicking the tool you're interested in.)

Things to keep in mind: 
- You want to make sure you are using a combination of the tools.
                i.e.Work the geo, then relax it, work the geo, then relax it.

- Keep changing views. If you are constantly working from the front view, it's tough to tell what kind of damage you're doing to the work you already put in on the side! Make sure you keep switching back and forth, and even working in the perspective window.


Step 5: Modify your Norman Blend shape

Save.

All modification to the norman rig (Hands, Feet, Face) should be done via the blend shape you created. This will prevent you from destroying any of the actual rig, which could easily break and become unusable for your animation.

Using the Norman Blend Shape, Scale the mesh to fit as closely as you can inside your modified Nart mesh. This will make for a cleaner wrap!


Modifying the Norman Blendshape to fit the sculpted Nart mesh.


Be warned of the following sensitive areas:

-The mouth (the entire face, really) is a highly-rigged area, thus it's best to do your best to leave it alone. Feel free to mess with the forehead and the cheeks within reason, but do try not to tamper too much. You may notice that Norman's nose is a separate geometry. To modify his nose, I'd suggest creating an entirely NEW nose and sticking it on later.


Putting red around the polygons of the mouth on the blendshape helps to remind yourself to avoid modding that area.

- The feet also have a ton of controls -- Ball roll, foot twist, toe tap, etc -- that could easily break if you change the foot too much. Thus, again, try not to change the orientation or the size too dramatically or you could be animating with out them.


Step 6: Extras!

Save.


Does your character have gloves, boots, sashes, belts, watches, or any other sort of extraneous detailing in the clothing? No problem!

For gloves/boots: Simply select the faces around the calf and/or forearm and duplicate. Scale the duplicated faces so they hover closely to the surface of the Nart Mesh, and then move vertices around as necessary to create the look that you want. We can wrap these on top to add a little flare, and so your mod isn't just wearing the equivalent of body paint.


Sashes, belts or clothing details: You can also create the details out of other objects like a torus or a cylinder etc, depending on your needs. Just make sure you model them almost like they are a part of the Nart Mesh you modified and then we can wrap those on top, too!


Watches and the like can simply be parented to the wrist using constraints. (Demo coming, Spring 2013)


Step 7: Prep for the Wrap

Save. (I'm sounding redundant, but you'll thank me later)

If your character is wearing clothes or gloves or boots, you should hide all the extraneous geo that will not be seen beneath them. You can do this by creating a new texture that is completely transparent and applying to the faces. Not all wraps are perfect and sometimes the extra geo can intersect what is visible, so might as well get it out of the way.

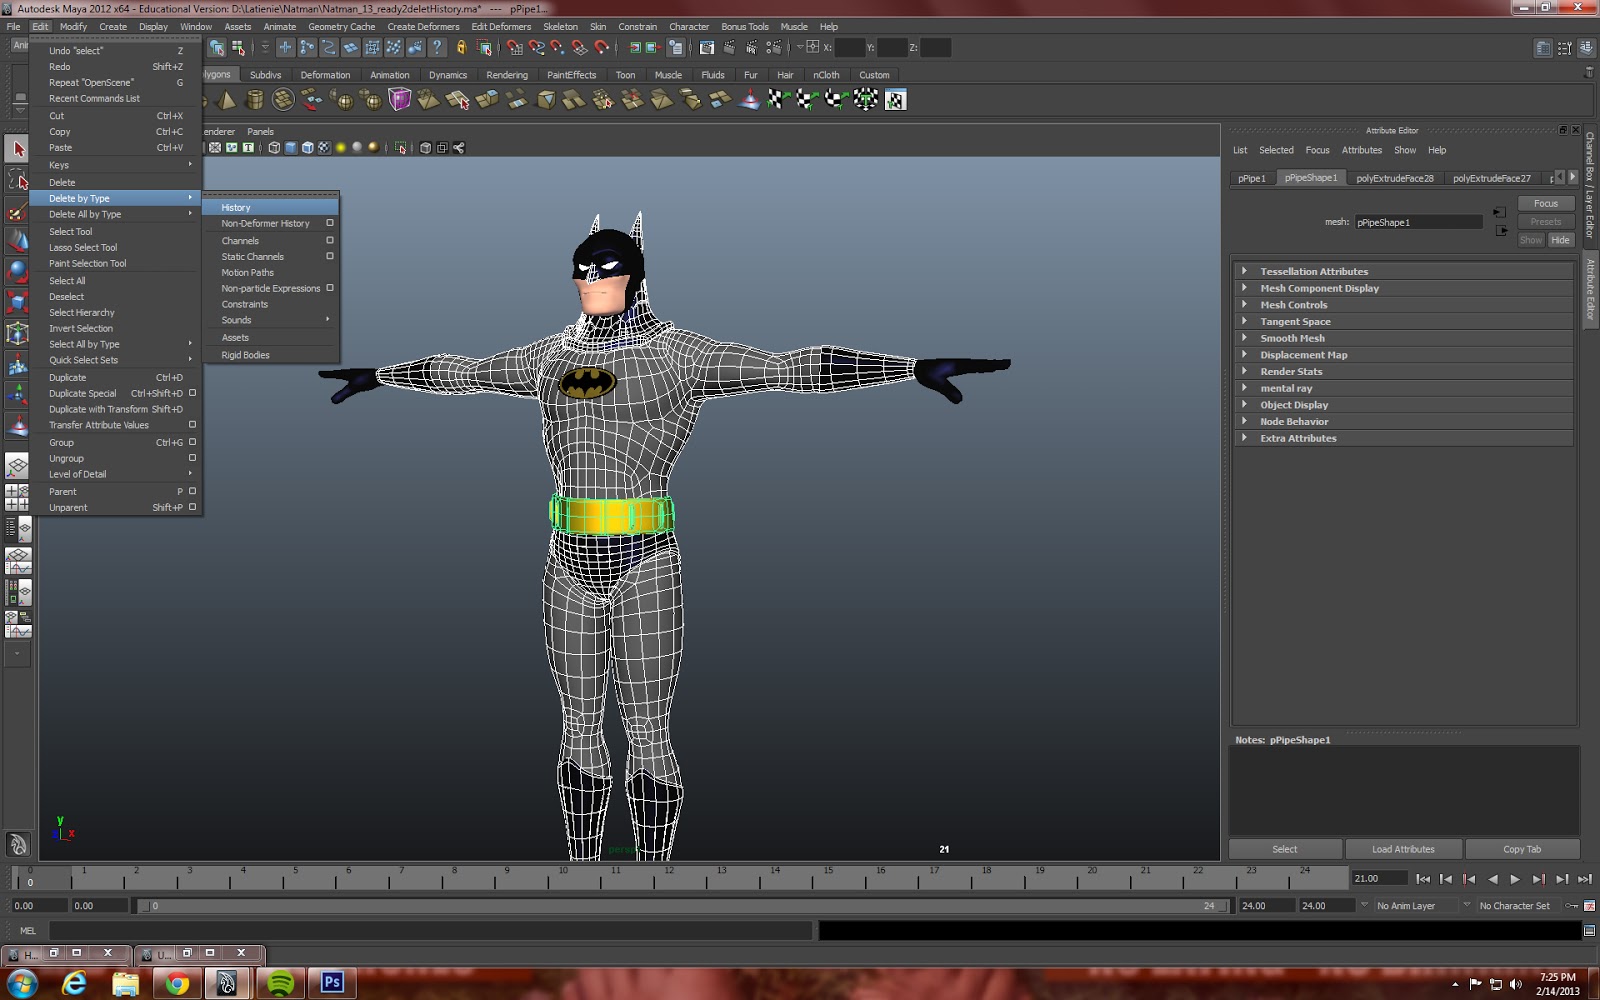
Delete history and Freeze Transformations on all geo to be wrapped. (NOT THE NORMAN MODEL OR BLENDSHAPE)

- Select all geo.
- Modify, Freeze Transformations
- Edit, Delete By Type, History


Freezing Transformations


Deleting History

Step 8: Wrap

Save.

To wrap:

- Select Nart mesh
- Select Norman Rig mesh. You will notice he is in pieces, start anywhere, you only need to select one piece of it. i.e. forearm
- Make sure you are under the animation tab, then Create Deformers > Wrap


Creating our wrap

Deselect all.

- Select Nart mesh
- Select the next piece of the Norman Rig mesh.
- Edit Deformers > Add influence
- Repeat until you have added every piece of Norman's rig as an influence


Adding an influence


Note: DO NOT WRAP TO THE BALL JOINTS. Norman's elbows ankles and feet are all spheres. Don't wrap to them. You just don't need to and it won't wrap as cleanly.

You can then wrap all your clothes (Gloves, boots, etc) to the wrap using the same process!
Parent all extras (ears, shoulder pads, watch etc) to the appropriate joint (head, clavicle, wrist, etc)

And there you have it! Feel free to comment or e-mail with any questions. Happy Modding!


A finished mod! Keep in mind that it won't be perfect, and you may have to seek the aid of a corrective blendshape to get things perfect. (see red arrow)


Friday, January 11, 2013

A Tea Time 'How To': Modifying the Norman Rig - Part I - Why Modify?

Now that everyone has already had ample time to lay back and take it easy, it's about that time to start warming yourself up for the upcoming semester. The tail end of the winter holiday is an ideal opportunity to take your Spring classes into consideration:

- How many animation classes do you have?
- What does the syllabus look like?
- How many assignments are there? But most importantly...
- What are you passionate about?

Working on an assignment is one thing, but fulfilling an assignment with work that you are truly interested in or passionate about will not only get you the grade you're supposed to hunger for, but will also give you a better result in the end.

How does Norman come into all of this? 

Well, for one thing, 99.9% of people are bored of looking at him. For another, even if you don't know it yet, so are you! Even if you colorize that bulbous body of his, it's almost impossible to get so worked up over his bland appearance, and animation generally suffers because of that. How can you expect someone else to be excited about your animation if you aren't?

As Bill Nye would say, Please consider the following:


Loses it's appeal, doesn't it? Thus, we mod!

Benefits of Modifying:

1. The obvious - Appeal! Modifying Norman to suit the needs of your animation creates appeal for your characters and will intrigue your audience -- Particularly if it's something they've never seen before.

2. Rig familiarity - One of the things all animators strive for is speed and efficiency. Doing the best job possible, the fastest possible. While Norman isn't the best rig on the market, he is reliable and easy to work with, thus modifying Norman rather than finding on making a new rig every time you take on a new project is time saving! Not just because you don't have to rig a whole new character (re: bullet 4), but because you will get used to working with Norman. When starting an animation you will know exactly what the rig is capable of, so you'll be able to streamline your ideas from the start. Plus, when getting down to it, you won't be searching for what control does what.

3. Buys you time - Not just in the speed of your animation, but in actually getting to the animation. It's tough sometime to come up with golden ideas on the fly, so thinking about a character first can be helpful. If you're not sure of a story, but know that you want to do a scene with, say a superhero, you can start taking the time to build the character, and then the ideas might come to you in the mean time. 

4. Faster than building a rig from scratch - Though creating your own rig is probably the BEST practice (and if you're capable of doing that within a certain time limit, good on you), it's not often we, as students, have the luxury of that kind of time. Modding Norman will give you your unique character without the painstaking hell that is painting weights -- and it's amazingly effective! (i.e. Fig. 1.0)

No matter how amazing your animation is, Norman -- or any of the basic rigs -- simply will not pack the punch you're looking for without some help.  So, with that in mind, let's get started. 


Fig. 1.0 - Yes. Believe it or not, behind that stern, bold bat logo on his chest, that's still Norman under there.


Thursday, January 10, 2013

Choose Your Own Adventure!

Happy New Year, Tea Time!
I certainly hope that everyone is enjoying their unrealistically long break so far. (AAU students, at least)

In light of the upcoming semester, with so many new students joining us from the Bay Area and beyond, I'd just like to invite everyone to submit (via comment, e-mail or the Facebook group) anything and everything they'd like to see out of Tea Time this Spring.

AAU Student? What sort of lectures or activities are you interested in?
Bay Area but not AAU affiliated? What sort of plans would you like to see set motion to get you involved in this community?
Online member? What more would you like to see from your online community?

Let us know to serve you better!

aauanimate@gmail.com
http://www.facebook.com/groups/TeaTimeAnimation

PS: Keep your eyes peeled tomorrow for Joey's Norman Modification tutorial -- including a link to download the base mesh!


Friday, December 14, 2012

Guest Speaker Joey Gilbreath


Joey Gilbreath -- Animator at PIXAR 
7:30pm room 415 @ 180 New Montgomery street


AAU Alumni turned PIXAR animator Joey Gilbreath will be joining us this evening to give us a demo on how to modify the Norman rig. Additionally, he will be telling us about his experiences as a student, surviving the PIXAR internship, and what it means to be a successful student.


Saturday, December 1, 2012

300


It wasn't long ago that I was posting about our 200 member achievement, but in only a few, short months, Tea Time has grown by 50%! Amazing.

Just wanted to say a quick thank you to all of us who made it out to CTN this year. It was an amazing conference, but it wouldn't have been half as great without the company.


Tea Time Animation at CTN 2012

Friday, November 30, 2012

Brenda Chapman -- CTN Kickoff

The unbelievably talented story artist and director, most recently known for her work on Brave, Brenda Chapman offered to CTN a heartwarming discussion on her work, where she started, and her inspirations -- most notably her family, and the relationship with her daughter that inspired Brave.

Brenda's lecture centered around four key elements that helped her as a zealous young woman looking to break into a world of men:


Now, because of the nature of her lecture, I found that much of it was a "had to be there" sort of thing. However, in speaking on passion there were a few gems in her lecture that I thought were too irresistible to share.

"If it doesn't immediately capture you, dig deep and find a place you can connect to."
As students, at least where we're studying, we don't come across this so often. We have a lot of liberty with choosing what shots we're going to do based upon our own desires. However, getting in to the industry, it's not so much a choice anymore as it is an assignment -- it's a job, right? At some point, each and every one of us is going to be assigned a shot we don't see eye-to-eye with. That's where this comes in.

Even in a shot we think is boring, it's important to find a way to connect with it on a level we understand. If the animator is bored or detached, the shot will be tough to get through and more often than not, the audience can feel that through their work. Sitting and really thinking on a shot and finding a way to get into it will make your life easier as a professional (you won't be sitting and hacking away at something you gate), and will truly make your own work sing.

"If you don't get the job that you really, really, really want...is it still worth doing?"
I found this to be a particularly engaging question -- and in her lecture she left it fairly open ended. I've discussed this subject with a few people since then and I've heard mixed responses. Yes...No...
That won't happen, I'll try until I get there...etc...

Brenda, on the other hand said "Who knows! Maybe not, but is that a reason to stop?" Even if we don't end up with our dream jobs, all that means is we have to find an outlet. If we're not satisfying creative desires in the workplace, it just gives us the opportunity to pursue that craving elsewhere. We're not all going to get those golden opportunities, it doesn't mean we can't make something great.

"Find it...then share it!"
I know, I know -- how many times are we going to put pressure on the fact that this is a collaborative industry? But I want to emphasize that it's not just about helping each other with shots and patting each other on the back upon getting the work done, but it's about keeping the fire alive in each other. For me, at least, animating -- yeah, I love it -- but it can feel like work, and there's been times where I've hated it. But when I'm excited and passionate and talking and sharing and "Oh my gosh have you seen this?!" with others, it never gets old -- no matter how bogus the shot.


For anyone who missed this amazing lecture and happens to be an aspiring story artist, Brenda Chapman teaches a one-on-one workshop through Motivarti. You can also check out Brenda's personal website and blog for some more insight into the industry and Brenda Chapman, herself.

Saturday, November 24, 2012

4 Different, Amazing Approaches to Acting: Context and Creativity

As promised, here was one of my personal favorite panels from CTN 2012. It featured Pixar/Animation  Collaborative animators Michal Makarewicz, Victor Navone, Rob Thompson and Aaron Hartline.

The group of four took on the challenge of using the same rig and the same line of dialogue to create blocking for four entirely different feeling characters/scenes. I managed to take some fairly succinct notes, so here's a little bit about the process each animator went through to create their final shot.

Aaron Hartline - "The Villain"

Lipsync First 

Animating the sync first (while the character is still in T-pose) really helps me to not over-animate through the body. Often enough having the character speaking can be enough movement to keep him alive, and it saves me from having to put in more movement or more poses than necessary.

I make sure to focus on the key words in the sentence, so I can make sure I give them enough emphasis and an interesting mouth-shape.

Animating the lipsync first buys me time! It's something that has to be done no matter what, so getting it done first gives me more time to think about the interesting situation or specific posing I want to put my character into.

Strike a Pose

I like to try and animate my scenes using as little posing as possible. i.e: For a shorter piece of dialogue like this one, I see if I can find one pose that can carry me through the whole thing.

The pose should start with a question -- something to intrigue the audience. We don't want to know he's a villain right off the bat, that's something we want to discover. Having an interesting pose that doesn't give everything away at a first glance is great because it will keep the viewer interested, and give me a place to go as an animator.

Simplify

Less is more!

Try to find something that you can relate to that you can draw from; Something you know. i.e For a villain, the way your mother or an aunt might look when they got angry when you were a kid. Think about your favorite movie villains, what sort of mannerisms them so frightening?

Ask an Expert

Make sure you show your work to someone else! Find someone that you trust and deliberate with them.

Rob Thompson - "The Job Applicant"

First things first, think about what you have -- the Dialogue, the rig, and the idea -- and consider what is involved in that kind of situation.

For a job applicant:

Emotions: Nervous, excited, anxious...

Conflicting advice: Act casual, but not too casual, dress nice, but not too nice...

Remember that there is a fine line between Confident vs. Cocky, Relaxed vs. Overly Casual, Enthusaistic vs. Over Zealous

Single Pose
Like Aaron mentioned, Can I find a single pose that can get me through the whole shot.

Consider the desires of the character -- like in this example from 'Peep Show'. The main character doesn't actually WANT to get the job, but he also doesn't want to make his friend, who turns out to be in the interview with him, look bad.


Find Your Lighthouse

Find the most important control on your rig - the one that will affect your scene the most - and use it as a guide for all the acting and the timing. (This is a lot like what we were talking about in our Power Centers lecture) For example, if the control is the neck, that person could feel like they have a lot of attitude. Really confident/cocky. 

Details

What specifics can I add while still being limited to one, main pose? i.e. Ricky Gervais in this clip: Same pose, but rocking back and forth in his chair.


Try to keep spontaneity -- don't over rehearse your line, because then it will feel over rehearsed. 


Victor Navone - "The Politician"

Research

Consider your options. Think about the ways you can open up possibilities for acting choices: i.e. For a politician, have them be in one of those circular town hall debates rather than behind a podium.

Context

-Think about character history
-Restrictions i.e. for a politician, one would say/do things differently while they are being filmed. There are certain behaviors that are accepted and/or expected from them that you should try to put into your work
-Environmental details and how they would affect your performance.
-Status: "who has the power" on your scene? How do you inform that through your performance?
-What are your characters goals?

Subtext

What is really being said through the dialogue?

Planning

Practice by drawing out some poses
Refer to Video reference

Inner Monologue

Find the moment of emphasis/biggest change and then emphasize it!

Process

Sketch blocking (2D posing!)
Simplify
Watch for accidental patterns

"It's a process of discovery for me. I had to go through  a lot of bad ideas before I could get to the ones that had worth." --Victor Navone

Mike Makarewicz - "The Mentor"

Macro-Look:


Like the others, consider context, dialogue (mood, subtext, etc), scene length.

Get to know your character!

Think about adjectives - 'ingredients, if you will - for your character
Really consider your character's history, because it will help define your characters choices.
Relate your character to people you know well enough already so that you are able to draw from that.

What's important to me:

-Energy -- progression, balance, contrast,
-Internal vs. External -- thinking vs. delivery
-Relatability -- connection with the audience
-Timing/texture
-Status


Monday, November 19, 2012

CTN 2012


CTN 2012, as per usual, was an absolutely phenomenal experience. We know that, for various reasons, not everyone can afford to attend, thus, we made sure to jot down gems of wisdom and take lots of explicit notes so we could share a little bit of the experience with those who missed out. Keep your eyes here for details!

Monday, November 12, 2012

Paranorman Lecture Tonight


We haven't advertised it much (and forgot to mention it in club! Sorry.) because we haven't actually had anything to do with the planning of it,  but tonight, LAIKA (Coraline, Paranorman) will be giving a lecture in AAU's own 79 NM theater. It starts a  7:30pm, but seating is limited and, as we all know, these things fill up fast so get there early.


Friday, November 9, 2012

CTN and Basic Networking

Club today started with a bang as Brandon took us all through a few, fun improv games. Needless to say we all got to know a deeper -- and sillier -- side to everyone.

Charging ahead, however, the majority of club was consumed by another whopping networking lecture. With the advent of another CTN in our midst, we thought it was important to bequeath a little knowledge on optimal conference behavior. Didn't make it? Check out detailed notes here.

Additionally, you would be keen to note that Tea Time is going to be taking a bit of a hiatus due to CTN and then thanksgiving the following weekend. Besides crossing paths at CTN (in some pretty sweet swag, if all goes well) we will reconvene on Friday, November 30th at the usual time/place for an extra special lecture. Will announce more in the near future so keep an eye out.

Happy animating!